TListBox/fr
│
Deutsch (de) │
English (en) │
suomi (fi) │
français (fr) │
日本語 (ja) │
Une TListBox ![]() est un composant qui montre une liste défilable de chaîne (courtes) dans laquelle l'utilisateur peut en sélectionner une. Il est disponible depuis l'onglet Standard de la palette de composants.
est un composant qui montre une liste défilable de chaîne (courtes) dans laquelle l'utilisateur peut en sélectionner une. Il est disponible depuis l'onglet Standard de la palette de composants.
Dans la TListBox, les chaînes sont enregistrées dans la propriété Items, qui est du type TStrings. donc vous pouvez affecter ou retirer des chaînes dans la ListBox comme dans TStringList ou son parent TStrings
Voici quelques exemples de comment utiliser une TListBox ListBox1 sur une fiche Form1 :
Remplir une ListBox
Avec l'inspecteur d'objet
- Sélectionnez le ListBox sur votre fiche avec un clic.
- Allez dans l'inspecteur d'objet, dans l'onglet Propriétés et sur la propriété Items.
- Cliquez sur le bouton avec les trois points. L'éditeur de liste de chaînes s'ouvre.
- Entrez votre texte et confirmez le tout avec OK.
Par code via un clic de bouton
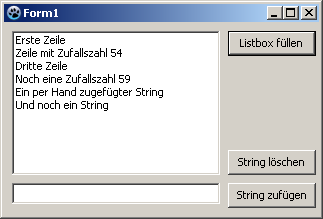
Ajoutez sur votre fiche une TButton nommé btnFill et un intitulé Remplir la liste. Dans le gestionnaire d'événement OnClick du bouton, vous écrivez le code suivant :
procedure TForm1.btnFillClick(Sender: TObject);
begin
  ListBox1.Items.Clear;             //Delete all existing strings
  ListBox1.Items.Add('First line');
  ListBox1.Items.Add('Line with random number '+IntToStr(Random(100)));
  ListBox1.Items.Add('Third line');
  ListBox1.Items.Add('Even a random number '+IntToStr(Random(100)));
end;
Affectation d'une StringList
Ajoutez sur votre fiche un TButton nommé btnFill intitulé Remplir la liste. Dans le gestionnaire d'événement OnClick du bouton, vous écrivez le code suivant :
procedure TForm1.btnFillClick(Sender: TObject);
var
  myStringList: TStringList;
begin
  myStringList:=TStringList.Create;               //Create my StringList
  try
    myStringList.Add('This is the first line.');   //This add a row
    myStringList.Add('This is the second first line.');
    myStringList.Add('This is the third line.');
    myStringList.Add('etc.');
    ListBox1.Items.Assign(myStringList);            //assign the ListBox1 the text content of my StringList
  finally
    myStringList.Free;                              //Free my StringList in memory
  end;
end;
Ajout d'une chaîne
- Etendez l'exemple Remplir un ListBox dans un clic de bouton en ajoutant un TEdit et un TButton nommé btnAdd et intitulé Ajouter une chaîne. Effacez la propriété Text.
- Dans le gestionnaire d'événement OnClick du bouton, vous écrivez le code suivant :
procedure TForm1.btnAddClick(Sender: TObject);
begin
  ListBox1.Items.Add(Edit1.Text);
  Edit1.Text:='';
end;
Supprimer une chaîne
Par défaut, vous pouvez seulement sélectionner une seule ligne dans la liste. En passant la propriété MultiSelect à True, vous pouvez sélectionner plusieurs lignes de la liste.
Un ItemIndex
- Etendez l'exemple Ajout d'une chaîne en ajoutant un TButton nommé "btnDel" et intitulé "Supprimer la chaîne".
- Dans le gestionnaire d'événement OnClick du bouton, vous écrivez le code suivant :
procedure TForm1.btnDelClick(Sender: TObject);
begin
  if ListBox1.ItemIndex > -1 then    //Delete only when a string in the listbox is selected
    ListBox1.Items.Delete(ListBox1.ItemIndex);
end;
Toutes les chaînes sélectionnées
- Etendez l'exemple Ajout d'une chaîne en ajoutant un TButton nommé "btnDel" et intitulé "Supprimer la chaîne".
- Dans le gestionnaire d'événement OnClick du bouton, vous écrivez le code suivant :
procedure TForm1.btnDelClick(Sender: TObject);
var
  i: Integer;
begin
  if ListBox1.SelCount > 0 then                 //Delete only if at least one string in the list box is selected
    for i:=ListBox1.Items.Count - 1 downto 0 do //Iterate through all the items
      if ListBox1.Selected[i] then              //If selected...
        ListBox1.Items.Delete(i);               //...delete the item (String)
end;
ListBox dessinée par le propriétaire
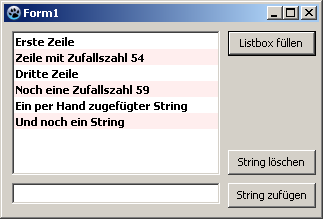
En général, il est préférable de laisser le ListBox suivre le thème défini par l'utilisateur. Dans certains cas (par exemple to programmer un jeu avec une surface toute colorée), vous pouvez vous détourner de ce standard et dessiner le contrôle selon votre propre choix. Vous pouvez essayer ceci maintenant :
- Vous pouvez modifier l'exemple précédent ou créer une nouvelle application avec un TListBox ListBox1.
- Dans l'inspecteur d'objet, modifiez la propriété Style de ListBox1 vers lbOwnerDrawFixed.
- Créez depuis l'inspecteur d'objet, onglet événements, le gestionnaire d'événement de OnDrawItem, en cliquant sur le bouton [...].
- Vous ajoutez le code suivant dans le gestionnaire :
procedure TForm1.ListBox1DrawItem(Control: TWinControl; Index: Integer;
  ARect: TRect; State: TOwnerDrawState);
var
  aColor: TColor;                       //Background color
begin
  if (Index mod 2 = 0)                  //Index tells which item it is
    then aColor:=$FFFFFF                //every second item gets white as the background color
    else aColor:=$EEEEFF;               //every second item gets pink background color
  if odSelected in State then aColor:=$0000FF;  //If item is selected, then red as background color
  ListBox1.Canvas.Brush.Color:=aColor;  //Set background color
  ListBox1.Canvas.FillRect(ARect);      //Draw a filled rectangle

  ListBox1.Canvas.Font.Bold:=True;      //Set the font to "bold"
  ListBox1.Canvas.TextRect(ARect, 2, ARect.Top+2, ListBox1.Items[Index]);  //Draw Itemtext
end;
![]() Remarque: Paramètres deListBoxDrawItem:
Remarque: Paramètres deListBoxDrawItem:
Control:
Si plusieurs contrôles (p.ex. de multiples ListBox) ont accès à ce gestionnaire, vous savez lequel a déclenché l'événement. Vous pouvez dans votre exemple au lieu de ListBox1.Canvas.FillRect(ARect) écrire aussi TListBox(Control).Canvas.FillRect(ARect), où vous devriez vérifier s'il s'agit d'un ListBox :
  if Control is TListBox then
    TListBox(Control).Canvas.FillRect(ARect);
Index:
Spécifie l'emplacement de l'article, vous avez ainsi accès à la chaîne <ListBox>.Items[Index].
ARect:
Décrit le rectangle, ce qui est nécessaire pour le dessin du fond.
State:
Etat de l'article, soit normal, mis en évidence (focus), sélectionné etc.
- Votre exemple pourrait ressembler à ceci :
Voir aussi
- Doc. TListBox
- TDBListBox Ce composant rendu sensible aux données.

