BGRABitmap tutorial 9
│ Deutsch (de) │ English (en) │ français (fr) │ русский (ru) │
Home | Tutorial 1 | Tutorial 2 | Tutorial 3 | Tutorial 4 | Tutorial 5 | Tutorial 6 | Tutorial 7 | Tutorial 8 | Tutorial 9 | Tutorial 10 | Tutorial 11 | Tutorial 12 | Tutorial 13 | Tutorial 14 | Tutorial 15 | Tutorial 16 | Edit
This tutorial shows how to use phong shading to make textures.
Create a new project
Create a new project and add a reference to BGRABitmap, the same way as in the first tutorial.
Phong shading and light
To use phong shading, you need to instanciate a TPhongShading class. It's located in BGRAGradients unit.
Let's add a variable in the form definition:
TForm1 = class(TForm)
  ...
  phong: TPhongShading;
When the form is created, we can create the class:
procedure TForm1.FormCreate(Sender: TObject);
begin
  phong := TPhongShading.Create;
  phong.LightPositionZ := 150;
  phong.SpecularIndex := 20;
  phong.AmbientFactor := 0.4;
  phong.LightSourceIntensity := 250;
  phong.LightSourceDistanceTerm := 200;
end;
The specular index indicates how concentrated the reflected light is.
When the form is destroyed:
procedure TForm1.FormDestroy(Sender: TObject);
begin
  phong.Free;
end;
When the form is painted, add some phong shaded object:
procedure TForm1.FormPaint(Sender: TObject);
var
  image: TBGRABitmap;

begin
    image := TBGRABitmap.Create(ClientWidth,ClientHeight,ColorToBGRA(ColorToRGB(clBtnFace)));

    phong.DrawSphere(image,rect(20,20,120,120),50,BGRA(255,0,0));

    image.Draw(Canvas,0,0,True);
    image.free;
end;
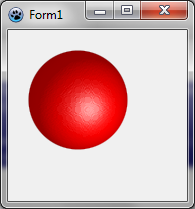
The parameter of DrawSphere are the destination image, the bounds of the object, the maximum altitude and the color. The diameter of the sphere is 100 so the maximum altitude of a hemisphere is 50.
Finally when the mouse is moved, it would be nice that the light source followed:
procedure TForm1.FormMouseMove(Sender: TObject; Shift: TShiftState; X,
  Y: Integer);
begin
  phong.LightPosition := point(X,Y);
  FormPaint(Sender);
end;
Run the program
You should be able to play with the light on the sphere:
Use phong shading to create textures
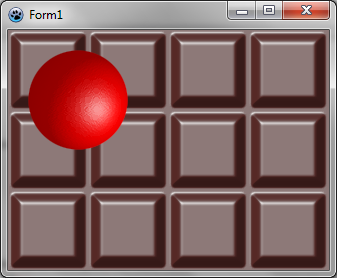
The following procedure creates a piece of chocolate:
function CreateChocolateTexture(tx,ty: integer): TBGRABitmap;
var
  square,map: TBGRABitmap;
  phong: TPhongShading;
  margin: integer;
begin
  margin := tx div 20; //empty space around the square
  square := CreateRectangleMap(tx-2*margin,ty-2*margin,tx div 8);

  //create a map with the square at the middle
  map := TBGRABitmap.Create(tx,ty,BGRABlack);
  map.PutImage(margin,margin,square,dmDrawWithTransparency);

  //apply blur to make it smoother
  BGRAReplace(map,map.FilterBlurRadial(tx div 40,rbFast));
  square.free;

  //create resulting bitmap
  result := TBGRABitmap.Create(tx,ty);

  //use phong shading
  phong := TPhongShading.Create;
  phong.LightSourceDistanceFactor := 0;
  phong.LightDestFactor := 0;
  phong.LightSourceIntensity := 200;
  phong.AmbientFactor := 0.5;
  phong.LightPosition := Point(-50,-100);
  phong.LightPositionZ := 80;

  //draw the piece of chocolate with max altitude 20
  phong.Draw(result,map,20,0,0,BGRA(86,41,38));
  map.Free;
  phong.Free;
end;
The phong shader uses a map of altitudes to render the light effects. Here, the map contains a square.
Among properties of the phong shader, there is LightSourceDistanceFactor and LightDestFactor. Setting these values to zero make the result tilable. Indeed, when the distance factor is zero, the distance between the light and the object is not taken into account, and when the light destination factor is zero, the position of the object is not taken into account when computing the angle of the light.
Now, when the form is created, create the chocolate texture:
chocolate := CreateChocolateTexture(80,80);
And when the form is destroyed:
chocolate.Free;
Before phong.DrawSphere in the OnPaint event, add this line:
image.FillRect(0,0,80*7,80*4,chocolate,dmSet);
Resulting code
unit UMain;

{$mode objfpc}{$H+}

interface

uses
  Classes, SysUtils, FileUtil, LResources, Forms, Controls, Graphics, Dialogs,
  ExtCtrls, Buttons, BGRABitmap, BGRABitmapTypes, BGRAGradients;

type
  { TForm1 }

  TForm1 = class(TForm)
    Timer1: TTimer;
    procedure FormCreate(Sender: TObject);
    procedure FormDestroy(Sender: TObject);
    procedure FormMouseMove(Sender: TObject; Shift: TShiftState; X, Y: Integer);
    procedure FormPaint(Sender: TObject);
  private
    { private declarations }
  public
    { public declarations }
    phong: TPhongShading;
    chocolate: TBGRABitmap;
  end;

var
  Form1: TForm1;

implementation

function CreateChocolateTexture(tx,ty: integer): TBGRABitmap;
var
  square,map: TBGRABitmap;
  phong: TPhongShading;
  margin: integer;
begin
  margin := tx div 20;
  square := CreateRectangleMap(tx-2*margin,ty-2*margin,tx div 8);
  map := TBGRABitmap.Create(tx,ty,BGRABlack);
  map.PutImage(margin,margin,square,dmDrawWithTransparency);
  BGRAReplace(map,map.FilterBlurRadial(tx div 40,rbFast));
  square.free;

  result := TBGRABitmap.Create(tx,ty);
  phong := TPhongShading.Create;
  phong.LightSourceDistanceFactor := 0;
  phong.LightDestFactor := 0;
  phong.LightSourceIntensity := 200;
  phong.AmbientFactor := 0.5;
  phong.LightPosition := Point(-50,-100);
  phong.LightPositionZ := 80;
  phong.Draw(result,map,20,0,0,BGRA(86,41,38));
  map.Free;
  phong.Free;
end;

{ TForm1 }

procedure TForm1.FormCreate(Sender: TObject);
begin
  phong := TPhongShading.Create;
  phong.LightPositionZ := 150;
  phong.SpecularIndex := 20;
  phong.AmbientFactor := 0.4;
  phong.LightSourceIntensity := 250;
  phong.LightSourceDistanceTerm := 200;

  chocolate := CreateChocolateTexture(80,80);
end;

procedure TForm1.FormDestroy(Sender: TObject);
begin
  phong.Free;
  chocolate.Free;
end;

procedure TForm1.FormMouseMove(Sender: TObject; Shift: TShiftState; X,
  Y: Integer);
begin
  phong.LightPosition := point(X,Y);
  FormPaint(Sender);
end;


procedure TForm1.FormPaint(Sender: TObject);
var
  image: TBGRABitmap;
begin
    image := TBGRABitmap.Create(ClientWidth,ClientHeight,ColorToBGRA(ColorToRGB(clBtnFace)));

    image.FillRect(0,0,80*7,80*4,chocolate,dmSet);
    phong.DrawSphere(image,rect(20,20,120,120),50,BGRA(255,0,0));

    image.Draw(Canvas,0,0,True);
    image.free;
end;

initialization
  {$I UMain.lrs}

end.
Run the program
You should see a nice bar of chocolate with a big cherry:
Using Perlin noise and phong shading together
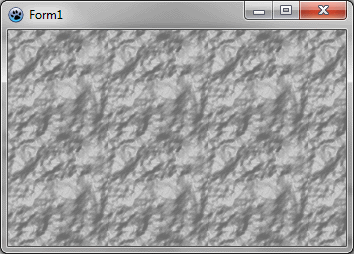
The idea is to create a map with a Perlin noise, and then use phong shading to render it. Here is how to create a stone texture:
  function CreateStoneTexture(tx,ty: integer): TBGRABitmap;
  var
    temp: TBGRABitmap;
    phong: TPhongShading;
  begin
    result := CreateCyclicPerlinNoiseMap(tx,ty,1,1,0.6);
    temp:= result.GetPart(rect(-2,-2,tx+2,ty+2)) as TBGRABitmap;

    phong := TPhongShading.Create;
    phong.LightSourceDistanceFactor := 0;
    phong.LightDestFactor := 0;
    phong.LightSourceIntensity := 100;
    phong.LightPositionZ := 100;
    phong.NegativeDiffusionFactor := 0.3;
    phong.AmbientFactor := 0.5;
    phong.Draw(result,temp,30,-2,-2,BGRA(170,170,170));

    phong.Free;
    temp.Free;
  end;
First, we create a cyclic map. It's important that it be cyclic in order to make a tilable texture. But then, when we will apply phong shading, we need to make the shader aware of the cycle. So, with GetPart, we extract the generated map with 2 more pixels on each border, so the shader can be applied to the map with the cycle.
The call to phong.Draw with offset (-2,-2) renders the map at the correct location, taking into account that we've added two pixels.
Now in the OnPaint event:
procedure TForm1.FormPaint(Sender: TObject);
var
  image: TBGRABitmap;
  stone: TBGRABitmap;
begin
    image := TBGRABitmap.Create(ClientWidth,ClientHeight,ColorToBGRA(ColorToRGB(clBtnFace)));

    stone := CreateStoneTexture(100,100);
    image.FillEllipseAntialias(200,100,150,50,stone);
    stone.free;

    image.Draw(Canvas,0,0,True);
    image.free;
end;
Run the program
You should see a form with a stoned background.
Rendering water
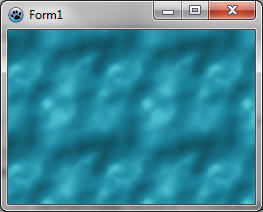
It is almost the same procedure to generate water texture:
function CreateWaterTexture(tx,ty: integer): TBGRABitmap;
const blurSize = 5;
var
  temp: TBGRABitmap;
  phong: TPhongShading;
begin
  result := CreateCyclicPerlinNoiseMap(tx,ty,1,1,1.2);
  temp:= result.GetPart(rect(-blurSize,-blurSize,tx+blurSize,ty+blurSize)) as TBGRABitmap;
  BGRAReplace(temp,temp.FilterBlurRadial(blurSize,rbFast));

  phong := TPhongShading.Create;
  phong.LightSourceDistanceFactor := 0;
  phong.LightDestFactor := 0;
  phong.LightSourceIntensity := 150;
  phong.LightPositionZ := 80;
  phong.LightColor := BGRA(105,233,240);
  phong.NegativeDiffusionFactor := 0.3;
  phong.SpecularIndex := 20;
  phong.AmbientFactor := 0.4;

  phong.Draw(result,temp,20,-blurSize,-blurSize,BGRA(28,139,166));
  phong.Free;
  temp.Free;
end;
The main difference is that we apply a blur filter to make it the water smooth and set the light color.
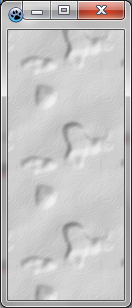
Using thresholds to render snow prints
It is possible to keep only a small subrange of altitudes, to have a texture that shows foot prints in the snow.
function CreateSnowPrintTexture(tx,ty: integer): TBGRABitmap;
var
  v: integer;
  p: PBGRAPixel;
  i: Integer;

  temp: TBGRABitmap;
  phong: TPhongShading;
begin
  //here a random map is generated
  result := CreateCyclicPerlinNoiseMap(tx,ty,1,1,1.2);

  //now we apply thresholds
  p := result.Data;
  for i := 0 to result.NbPixels-1 do
  begin
    v := p^.red;
    //if the value is above 80 or under 50, then we divide it by 10 to make it almost horizontal
    if v > 80 then v := (v-80) div 10+80;
    if v < 50 then v := 50-(50-v) div 10;
    p^.red := v;
    p^.green := v;
    p^.blue := v;
    inc(p);
  end;

  //to make phong shader aware of the cycle
  temp:= result.GetPart(rect(-2,-2,tx+2,ty+2)) as TBGRABitmap;
  //apply a radial blur
  BGRAReplace(temp,temp.FilterBlurRadial(2,rbFast));
  phong := TPhongShading.Create;
  phong.LightSourceDistanceFactor := 0;
  phong.LightDestFactor := 0;
  phong.LightSourceIntensity := 100;
  phong.LightPositionZ := 100;
  phong.NegativeDiffusionFactor := 0.3; //want shadows
  phong.Draw(result,temp,30,-2,-2,BGRAWhite);
  phong.Free;
  temp.Free;
end;
We obtain this:
Previous tutorial (textures) Next tutorial (texture mapping)
