How To Write Lazarus Component/es
│
Deutsch (de) │
English (en) │
español (es) │
magyar (hu) │
italiano (it) │
한국어 (ko) │
русский (ru) │
中文(中国大陆) (zh_CN) │
Esta es una guía sobre como construir componentes.
Paso 1: Crear el paquete
- On the Lazarus IDE menu, click Package > New Package to run the Package Manager.

- A Save file dialog will appear. Chose a folder and a file name and press save. If the IDE prompts for using lowercase filenames press 'yes'.
- Congratulations: You have just created your first package!

Paso 2: Crear la unit
You can create a new unit or use an existing file. Both options are described below.
Crear una nueva unit
- Use the Add button > Nuevo componente.

- Escoge un componente tal como TComboBox.
- Escoge customcontrol1.pas como Nombre de fichero para la unit y CustomControl1 como Nombre de la unit.
- Ahora ya puedes asignar al componenete un icono y determinar en que solapa de la paleta del IDE de Lazarus aparecera el componente.
- Click en Crear Nuevo Componente.
unit CustomControl1;

{$mode objfpc}{$H+}

interface

uses
  Classes, SysUtils, LResources, Forms, Controls, Graphics, Dialogs, StdCtrls;

type
  TCustomControl1 = class(TComboBox)
  private
    { Declaraciones Privadas}
  protected
    { Declaraciones Protegidas }
  public
    { Declaraciones Públicas }
  published
    { Declaraciones Publicadas }
  end;

procedure Register;

implementation

procedure Register;
begin
  RegisterComponents('Standard',[TCustomControl1]);
end;

end.- Instala el paquete haciendo click en Use -> Install button at the top of the package editor.

- Ahora el IDE te preguntará ¿Desea reconstruir ahora Lazarus?, le indicamos que [Si].

- Una vez reiniciado el IDE de Lazarus deberiamos poder ver el nuevo componente en la paleta dentro de la solapa adecuada. Felicidades, ya tienes instalado tu primer paquete con tu primer paquete de componente.

![]() Nota: If you do not see your new component in the component palette, es más que probable que no estes corriendo la versión re-compilada de Lazarus. Puedes establecer donde se construirá Lazarus seleccionando el trayecto en Herramientas -> Opciones -> Entorno -> Archivos -> Directorio de Lazarus (predeterminado para todos los proyectos).
Nota: If you do not see your new component in the component palette, es más que probable que no estes corriendo la versión re-compilada de Lazarus. Puedes establecer donde se construirá Lazarus seleccionando el trayecto en Herramientas -> Opciones -> Entorno -> Archivos -> Directorio de Lazarus (predeterminado para todos los proyectos).
Añadir una unidad existente
Si ya tienes una unidad creada la puedes añadir al paquete:

- Click the Add button, go to the Add Files tab. At the Unit file name, browse to your existing file. Click Add files to package. If the package manager complains that the unit is not in the unit path, click yes to add the directory to the unit path.
- Click the Add button again, go to the Add Files tab, browse to the .lrs file and click OK (See Step 3 about creating this icon file).
- Click the Add button again, go to the New Requirement tab. In the Package name select LCL and click OK.
El resultado final debería parecerse a esto:

- Click under the Files tree in the Package Manager. In the File Properties, make sure Register unit is checked.
- Click the Options button. Select the IDE Integration tab. In Package Type, make sure Designtime and Runtime is selected.
- Click the Compile button to check to see that the files compile without errors.
- Click the Install button. Lazarus will rebuild and restart automatically.
El componente se ha creado y está listo para ser utilizado:
![]()
Paso 3: Crear iconos para el paquete
Se deben crear iconos con dimensiones 24x24 píxeles y formato de fichero PNG.
FPC es capaz de utilizar ficheros de recurso estandar .rc y recursos compilados .res desde la versión 2.6. Ver Lazarus_Resources#FPC_resources
Por hacer: escribir la descripción de creación de iconos utilizando recursos FPC.
Los .lrs: ver más abajo.
Utilizando el Editor de Imágen de Lazarus
Puedes utilizar el Editor de Imágenes de Lazarus para crear los iconos en formato ".lrs".
Utilizando lazres
lazres se encuentra habitualmente en el directorio tools de Lazarus.
Se necesita compilarlo para su primer uso lazres. Simplemente abre el fichero lazres.lpi en el IDE y haz click en run > build en el menu.
Create lrs file
Para crear el fichero lrs arranca:
~/lazarus/tools/lazres samplepackage.lrs TMyCom.png
Donde:
- samplepackage es el nombre de tu paquete.
- TMyCom es el nombre de tu componente. El nombre de la imagen debe coincidir con el nombre de tu componente.
Puedes añadir más de una imagen al fichero lrs añadiendo el nombre del fichero de imagen al final. E.g. ~/lazarus/tools/lazres samplepackage.lrs TMyCom.png TMyOtherCom.png ... Y Ejemplo
El siguiente es un ejemplo del fichero samplepackage.lrs resultante.
LazarusResources.Add('TMyCom','PNG',[
  #137'PNG'#13#10#26#10#0#0#0#13'IHDR'#0#0#0#24#0#0#0#24#8#2#0#0#0'o'#21#170#175
  +#0#0#0#4'gAMA'#0#0#177#143#11#252'a'#5#0#0#0'|IDAT8O'#237#212#209#10#192' '#8
  +#5'P'#247#231#251's'#215#138#133#164#166'\'#220#195'`'#209'c'#157'L'#173#131
  +#153#169'd4'#168'dP'#137'r_'#235'5'#136'@Zmk'#16'd9'#144#176#232#164'1'#247
  +'I'#8#160'IL'#206'C'#179#144#12#199#140'.'#134#244#141'~'#168#247#209'S~;'#29
  +'V+'#196#201'^'#10#15#150'?'#255#18#227#206'NZ>42'#181#159#226#144#15'@'#201
  +#148#168'e'#224'7f<@4'#130'u_YD'#23#213#131#134'Q]'#158#188#135#0#0#0#0'IEND'
  +#174'B`'#130
]);
Make sure to include your resource file in your new component source by adding the following at the bottom your component's unit and including "LResources" in the uses clause
initialization
  {$I samplepackage.lrs}
Utilizando glazres
GLazRes is the graphical version of lazres that can assemble files into a Lazarus resource file (.lrs). It can be found in the tools directory of a Lazarus installation.
Recompilando paquetes
You need to rebuild the package every time you make changes to the mycom.pas file. To rebuild the package, open the samplepackage.lpk file in the Package Manager and click the Install button.
Eliminando paquetes
- To remove installed components: on the IDE menu, click Package > Configure installed packages. The following image shows the Installed Packages tool.
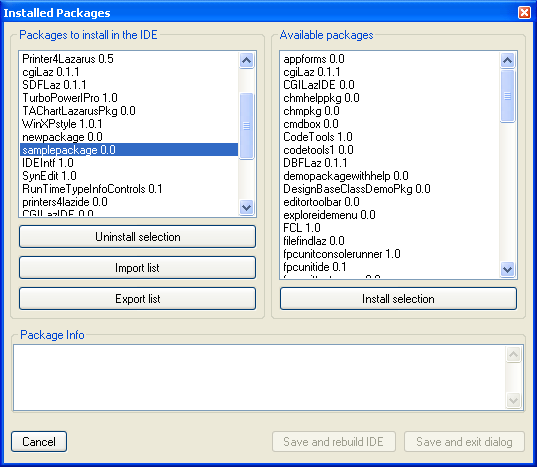

- Select the package you want to uninstall and click Uninstall selection.
If something goes wrong with a package (e.g. package directory is deleted without first uninstalling it), Lazarus may not allow you to uninstall packages. To fix the problem, at the IDE menu click Tools > Build Lazarus. Lazarus will rebuild all packages and restart. You should now be able to uninstall problematic packages.
Mejorando mycom.pas
- El código en mycom.pas te muestra lo básico que necesitas para crear un componente. Lo siguiente es una mejora con algunos tips sobre como escribir procedimientos y eventos para componentes.
- The OnChange2 muestra como crear eventos.
- The OnSample shows how to create custom events
- MyText and MyText2 shows different ways to write properties.
- You can use TComboBox instead of TCustomComboBox as the base class, which publishes all properties as TComboBox.
- If TCustomComboBox is used as the base class, you'll notice a lot of properties and events will be missing in the IDE Object Inspector. To add those properties and events, just copy and paste the properties as listed below // properties from TComboBox. These list of properties can be got from the TComboBox declaration in the StdCtrls unit. Omit any property which you want to handle yourself.
unit mycom;

{$mode objfpc}{$H+}

interface

uses
  Classes, SysUtils, StdCtrls, Forms, Dialogs,
  LCLType,LCLIntf,lresources,LCLProc;

type

  TSampleEvent = procedure(MyText: String) of Object;

  TMyCom = class (TCustomComboBox)
  private
    FMyText: String;
    FOnChange2: TNotifyEvent;
    FOnSample: TSampleEvent;
  public
    constructor Create(TheOwner: TComponent); override;
    procedure CreateWnd; override;
    procedure Change; override;
  protected
    function GetMyText2: String;
    procedure SetMyText2(MyText: String);
  published
    property MyText: String read FMyText write FMyText;
    property MyText2: String read GetMyText2 write SetMyText2;
    property OnChange2: TNotifyEvent read FOnChange2 write FOnChange2;
    property OnSample: TSampleEvent read FOnSample write FOnSample;

    // properties from TComboBox
    property Align;
    property Anchors;
    property ArrowKeysTraverseList;
    property AutoComplete;
    property AutoCompleteText;
    property AutoDropDown;
    property AutoSelect;
    property AutoSize;
    property BidiMode;
    property BorderSpacing;
    property CharCase;
    property Color;
    property Ctl3D;
    property Constraints;
    property DragCursor;
    property DragMode;
    property DropDownCount;
    property Enabled;
    property Font;
    property ItemHeight;
    property ItemIndex;
    property Items;
    property ItemWidth;
    property MaxLength;
    property OnChange;
    property OnChangeBounds;
    property OnClick;
    property OnCloseUp;
    property OnContextPopup;
    property OnDblClick;
    property OnDragDrop;
    property OnDragOver;
    property OnDrawItem;
    property OnEndDrag;
    property OnDropDown;
    property OnEditingDone;
    property OnEnter;
    property OnExit;
    property OnGetItems;
    property OnKeyDown;
    property OnKeyPress;
    property OnKeyUp;
    property OnMeasureItem;
    property OnMouseDown;
    property OnMouseMove;
    property OnMouseUp;
    property OnStartDrag;
    property OnSelect;
    property OnUTF8KeyPress;
    property ParentBidiMode;
    property ParentColor;
    property ParentCtl3D;
    property ParentFont;
    property ParentShowHint;
    property PopupMenu;
    property ReadOnly;
    property ShowHint;
    property Sorted;
    property Style;
    property TabOrder;
    property TabStop;
    property Text;
    property Visible;
  end;

procedure Register;

implementation

procedure Register;
begin
  RegisterComponents('Sample',[TMyCom]);
end;

constructor TMyCom.Create(TheOwner: TComponent);
begin
  inherited Create(TheOwner);
  Self.Style := csDropDownList;
end;

procedure TMyCom.CreateWnd;
begin
  inherited CreateWnd;
  Items.Assign(Screen.Fonts);
end;

procedure TMyCom.Change;
begin
  inherited;
  if Assigned(FOnChange2) then FOnChange2(Self);
  if Assigned(FOnSample) then FOnSample(FMyText);
end;

function TMyCom.GetMyText2: String;
begin
  Result:=FMyText;
end;

procedure TMyCom.SetMyText2(MyText: String);
begin
  FMyText:=MyText;
end;

initialization
  {$I samplepackage.lrs}

end.
Also you will notice that some undeclared and possibly unwanted elements exist in the IDE Object Inspector. To remove those of them, which you do not need, you can redeclare them in the Published section as simple variables. For example:
Published
...
    property Height: Integer;
    property Width:  Integer;
...
Utilizando componentes (visuales) embebidos
Puedes utilizar componenetes estandar embebidos dentro de tus propios componentes (mira por ejemplo en TLabeledEdit o TButtonPanel).
Digamos que necesitas crear un panel personalizado con un TLabel en el mismo. Con los pasos descritos se pueden crear el paquete base y los ficheros fuente.
Ahora haz lo siguiente para añadir un TLabel al componente:
- Añade un atributo para el componente label(FEmbeddedLabel: TLabel;).
- Añade una propiedad publicada de solo lectura para el componente label (property EmbeddedLabel: TLabel read FEmbeddedLabel;)
- Create the label in the component's (overridden) constructor (FEmbeddedLabel := TLabel.Create(self); )
- Set the parent of the component (FEmbeddedLabel.Parent := self;)
- If the component to be embedded is not a 'subcomponent' by default (like TBoundLabel, TPanelBitBtn etc) then add the call to SetSubComponent. This is necessary for the IDE so it knows that it has to store the properties of the embedded component as well. TLabel is not a subcomponent by default so the call to the method must be added (FEmbeddedLabel.SetSubComponent(true);).
To sum it up you would get something like this (solamente se muestran las partes esenciales):
TEnhancedPanel = class(TCustomControl)
private
  { El nuevo atributo para el label embebido }
  FEmbeddedLabel: TLabel;

public
  { El contructor debe ser overriden para que el label pueda crearse }
  constructor Create(AOwner: TComponent); override;

published
  { Hacer el label visible en el IDE }
  property EmbeddedLabel: TLabel read FEmbeddedLabel;
end;

implementation

constructor TEnhancedPanel.Create(AOwner: TComponent);
begin
  inherited Create(AOwner);

  // Establece el ancho y alto por defecto
  with GetControlClassDefaultSize do
    SetInitialBounds(0, 0, CX, CY);

  // Add the embedded label
  FEmbeddedLabel := TLabel.Create(Self); // Add the embedded label
  FEmbeddedLabel.Parent := self;         // Show the label in the panel
  FEmbeddedLabel.SetSubComponent(true);  // Tell the IDE to store the modified properties
  FLabel.Name := 'EmbeddedLabel';
  FLabel.Caption := 'Howdy World!';

  // Make sure the embedded label can not be selected/deleted within the IDE
  FLabel.ControlStyle := FLabel.ControlStyle - [csNoDesignSelectable];

  // Establecer otras propiedades si es neceario
  //...

end;
Using custom paint procedure
You can always subclass a component inside your program. For example, this implements a custom Paint procedure to a TLabel:
type
  TMyLabel = class(TLabel)
    protected
      procedure Paint; override;
  end;
{...}
implementation
{...}
procedure TMyLabel.Paint;
begin
  // your code to implement Paint, for example
  Canvas.TextOut(0,0,Caption);
end;
Now you can create a MyLabel inside your program, at run time, with that overridden Paint procedure instead of the standard one.
For most components, and for most methods, it would be recommendable to call inherited procedure inside it:
procedure TMyLabel.Paint;
begin

  inherited Paint;   /////////////////////

  // your code to implement Paint, for example
  Canvas.TextOut(0,0,Caption);
end;
However, inherited behavior is not desirable in this case, since the second writing action would overlap the first (inherited) one.
Integrating the component with the IDE
Property editors
Property editors provide custom dialogs to edit properties in the object inspector. For most properties, like strings, string lists, images, enumerated types and others, there are already default property editors, but if a custom component has a special kind of property it may require a custom dialog to edit the property.
Each property editor is a class, which should descend from TPropertyEditor or one of its descendents and implement methods from this base class. They should be registered in the 'Register' procedure by using the function RegisterPropertyEditor from the unit PropEdits. It is a standard to name property editors with the property name followed by 'Property', for example TFieldProperty for the property editor of the TField property.
  TPropertyEditor = class
  public
    function  AllEqual: Boolean; Virtual;
    function  AutoFill: Boolean; Virtual;
    procedure Edit; Virtual;     // Activated by double-clicking the property value
    procedure ShowValue; Virtual; // Activated by control-clicking the property value
    function  GetAttributes: TPropertyAttributes; Virtual;
    function  GetEditLimit: Integer; Virtual;
    function  GetName: ShortString; Virtual;
    procedure GetProperties(Proc: TGetPropEditProc); Virtual;
    function  GetHint(HintType: TPropEditHint; x, y: integer): String; Virtual;
    function  GetDefaultValue: AnsiString; Virtual;
    procedure GetValues(Proc: TGetStrProc); Virtual;
    procedure SetValue(const NewValue: AnsiString); Virtual;
    procedure UpdateSubProperties; Virtual;
    function  SubPropertiesNeedsUpdate: Boolean; Virtual;
    function  IsDefaultValue: Boolean; Virtual;
    function  IsNotDefaultValue: Boolean; Virtual;
    // ... shortened
  end;
A good example for a property editor is the TFont property editor.
One of the most common cases for property editors is properties which are classes. Because classes have many fields and can have a variety of formats, it's not possible for Lazarus to have the object inspector edit field able to edit it, like is done for strings and numeric types.
For classes, a convention is to have the value field show permanently the name of the class in parentheses, for example "(TFont)" and the "..." button shows a dialog to edit this class. This behaviour, except for the dialog, is implemented by a standard property editor for classes called TClassPropertyEditor, which can be inherited from when writing property editors for classes:
TClassPropertyEditor = class(TPropertyEditor)
public
  constructor Create(Hook: TPropertyEditorHook; APropCount: Integer); Override;
  function GetAttributes: TPropertyAttributes; Override;
  procedure GetProperties(Proc: TGetPropEditProc); Override;
  function GetValue: AnsiString; Override;
  property SubPropsTypeFilter: TTypeKinds Read FSubPropsTypeFilter
                                         Write SetSubPropsTypeFilter
                                       Default tkAny;
end;
Going back to the TFont example, inheriting from TClassPropertyEditor already offers part of the desired behavior and then the TFontPropertyEditor class only needs to implement showing the dialog in the Edit method and set the attributes for the editor:
  TFontPropertyEditor = class(TClassPropertyEditor)
  public
    procedure Edit; Override;
    function  GetAttributes: TPropertyAttributes; Override;
  end;

procedure TFontPropertyEditor.Edit;
var
  FontDialog: TFontDialog;
begin
  FontDialog := TFontDialog.Create(NIL);
  try
    FontDialog.Font    := TFont(GetObjectValue(TFont));
    FontDialog.Options := FontDialog.Options + [fdShowHelp, fdForceFontExist];
    if FontDialog.Execute then SetPtrValue(FontDialog.Font);
  finally
    FontDialog.Free;
  end;
end;

function TFontPropertyEditor.GetAttributes: TPropertyAttributes;
begin
  Result := [paMultiSelect, paSubProperties, paDialog, paReadOnly];
end;
Component editors
Component editors control the behavior of right-clicking and double clicking components in the form designer.
Each component editor is a class, which should descend from TComponentEditor or one of its descendents and implement methods from this base class. They should be registered in the 'Register' procedure by using the function RegisterComponentEditor from the unit ComponentEditors. It is a standard to name component editors with the component name followed by 'Editor', for example TStringGridComponentEditor for the property editor of the TStringGrid component. Although user component editors should be based in TComponentEditor, most of its methods are actually from an ancestor, so it is necessary to also know TBaseComponentEditor:
  TBaseComponentEditor = class
  protected
  public
    constructor Create(AComponent: TComponent;
                       ADesigner: TComponentEditorDesigner); Virtual;
    procedure Edit; Virtual; Abstract;
    procedure ExecuteVerb(Index: Integer); Virtual; Abstract;
    function  GetVerb(Index: Integer): String; Virtual; Abstract;
    function  GetVerbCount: Integer; Virtual; Abstract;
    procedure PrepareItem(Index: Integer; const AnItem: TMenuItem); Virtual; Abstract;
    procedure Copy; Virtual; Abstract;
    function  IsInInlined: Boolean; Virtual; Abstract;
    function  GetComponent: TComponent; Virtual; Abstract;
    function  GetDesigner: TComponentEditorDesigner; Virtual; Abstract;
    function  GetHook(out Hook: TPropertyEditorHook): Boolean; Virtual; Abstract;
    procedure Modified; Virtual; Abstract;
  end;
The most important method of a component editor is Edit, which is called when the component is double clicked. When the context menu for the component is invoked the GetVerbCount and GetVerb methods are called to build the menu. If one of the verbs (which means menu items in this case) are selected, ExecuteVerb is called. There is a default component editor (TDefaultEditor) which implements Edit to search the properties of the component for the most appropriate one to be edited. It usually chooses an event, which is edited by adding it's skeleton code in the code editor and setting the cursor to be in place to add code for it.
Other important methods from TBasComponentEditor are: ExecuteVerb(Index), which executes one of the extra menu items placed on the right-click popup menu; GetVerb – To return the name of each extra popup menu item. Note that it is the responsibility of the component editor to place special menu item caption characters like & to create a keyboard accelerator and “-” to create a separator; GetVerbCount – Returns the amount of items to be added to the popup menu. The index for the routines GetVerb and ExecuteVerb is zero based, going from 0 to GetVerbCount – 1; PrepareItem – Called for each verb after the menu item was created. Allows the menu item to be customized such as by adding subitems, adding a checkbox or even hiding it by setting Visible to false; Copy - Called when the component is being copied to the clipboard. The component data for use by Lazarus will always be added and cannot be modified. This method is instead for adding a different kind of clipboard information to paste the component in other applications, but which won't affect the Lazarus paste.
A simple and interesting example is the TCheckListBox component editor which creates a dialog to edit. More convenient then implementing all methods from TBaseComponentEditor is inheriting from TComponentEditor, and this is what TCheckListBoxEditor does. This base class adds empty implementations for most methods and some default ones for others. For Edit it calls ExecuteVerb(0), so if the first item will be identical to the double-click action, which is a convention for editor, there is no need to implement Edit. This basic action for the double-click and first menu item is often a dialog, and for TCheckListBox this is also done:
  TCheckListBoxComponentEditor = class(TComponentEditor)
  protected
    procedure DoShowEditor;
  public
    procedure ExecuteVerb(Index: Integer); override;
    function  GetVerb(Index: Integer): String; override;
    function  GetVerbCount: Integer; override;
  end;

procedure TCheckGroupComponentEditor.DoShowEditor;
var
  Dlg: TCheckGroupEditorDlg;
begin
  Dlg := TCheckGroupEditorDlg.Create(NIL);
  try
    // .. shortened
    Dlg.ShowModal;
    // .. shortened
  finally
    Dlg.Free;
  end;
end;

procedure TCheckGroupComponentEditor.ExecuteVerb(Index: Integer);
begin
  case Index of
    0: DoShowEditor;
  end;
end;

function TCheckGroupComponentEditor.GetVerb(Index: Integer): String;
begin
  Result := 'CheckBox Editor...';
end;

function TCheckGroupComponentEditor.GetVerbCount: Integer;
begin
  Result := 1;
end;
Depurando un componente en tiempo de diseño
Para detectar errores en tiempo de diseño en un (nuevamente creado) dbgcomponent:
- Abrir proyecto C:\lazarus\ide\lazarus.lpi;
- Ejecutar proyecto;
- Establecer punto de interrupción en dbgcomponent in main (1st) app;
- use dbgcomponent pascal code in second app;
- step through design-time component code in debug-session; do whatever is necessary;
See also
- Extending the IDE
- Lazarus Packages - A guide for creating a package under Lazarus
- Components and Code examples
- Lazarus Components
- IDE Window: Add to Package
You can post questions regarding this page here