Difference between revisions of "Anchor Docking/zh CN"
(Created page with "{{LanguageBar}} About docking in general see Docking. ==Overview== Docking allows you to combine forms, or to treat controls as forms. You use the mouse to drag and doc...") |
|||
| (One intermediate revision by one other user not shown) | |||
| Line 1: | Line 1: | ||
{{LanguageBar}} | {{LanguageBar}} | ||
| − | + | 关于停靠的一般信息,请参阅[[Docking]]。 | |
| − | == | + | ==概述== |
| − | + | 停靠允许您将窗体组合起来,或将控件视为窗体。您可以使用鼠标将窗体拖放停靠在一起或取消停靠(拆分)它们。基本的拖动、停靠和取消停靠功能由LCL提供。但您需要停靠管理器来添加分割条和抓取区域,以及保存和恢复布局。 | |
| − | + | 锚点停靠自0.9.29版本起在''anchordocking.lpk''包中实现,用于您自己的Lazarus应用程序,如果您希望使Lazarus IDE窗口可停靠,则使用''AnchorDockingDsgn.lpk''。它易于使用,并提供了许多早期停靠包中不可用的功能和选项。 | |
| − | + | 您可以在以下位置找到代码示例:components/anchordocking/miniide/miniide1.lpi | |
| − | + | 这意味着早期的TLazDockingManager和LDockCtrl单元已过时,现在已被弃用。 | |
| − | === | + | ===特色=== |
| − | *'''Drag and dock''': | + | *'''Drag and dock | 拖放停靠''': 添加了标题,可以拖动以用鼠标停靠控件。预览矩形将显示控件停靠的位置和方式。 |
| − | *'''Any layout''': | + | *'''Any layout | 任何布局''': 通过使用LCL的锚点,几乎可以实现任何布局。您可以停靠到左、右、上、下、内部或外部,或像TPageControl中的页面一样。您可以通过弹出菜单放大停靠的控件。无需取消停靠整个布局。 |
| − | *'''What you see is how it is structured''': | + | *'''What you see is how it is structured|所见即所得''': 没有隐藏的面板来对齐行和列中的控件。锚点停靠确保窗体不重叠。 |
| − | *'''Splitters''' | + | *'''Splitters | 分割条'''会自动插入停靠的窗体之间,以允许调整大小。 |
| − | *'''Page docking'''. | + | *'''Page docking | 页面停靠'''. 窗体不仅可以停靠到左/右/上/下,还可以停靠到页面中。将自动创建TPageControl以实现原生外观和感觉。页面可以包含任意停靠的窗体,包括分页停靠的窗体,允许嵌套页面和布局。当页面被取消停靠时,页面控件会自动删除。您可以拖放选项卡或使用弹出菜单移动页面。 |
| − | *'''Easy use''': | + | *'''Easy use|易于使用''': 通过一行代码,您可以使窗体或控件可停靠。只需为它们提供唯一的名称。 |
| − | * | + | *不仅窗体,任何'''TWinControl'''都可以被设置为可停靠。 |
| − | * | + | *可以'''保存/加载布局'''。停靠控件的布局信息被存储,即使应用程序获得更多的可停靠控件或移除了一些控件,旧的布局文件仍然可以工作。信息存储在LCL的TConfigStorage抽象类中。因此,您可以使用例如TXMLConfigStorage将布局存储在xml文件中,或者编写您自己的存储来将布局存储在任何您想要的位置。 |
| − | * | + | *每个停靠的窗体都被放入一个停靠站点,提供一个可选的'''标题'''。标题显示停靠窗体的标题,并包含一个关闭按钮。您可以''拖动标题''来拖动窗体、取消停靠或将其停靠到另一个位置。标题可以位于四个边的任何一边,默认情况下会自动移动到较小的一边以节省空间。您可以自定义此设置。标题显示一个可自定义的提示,允许读取长标题。 |
| − | * | + | *当停靠站点被调整大小时,''子站点会自动缩放''。您可以关闭此功能。 |
| − | *'''Preserve size of forms'''. | + | *'''Preserve size of forms|保持窗体大小'''. 例如,当将窗体停靠到站点的左侧时,停靠窗体的宽度保持不变。其他边和解除停靠也是如此。 |
| − | *'''Flickerless''': | + | *'''Flickerless|无闪烁''': 恢复时尝试重用现有的站点和分割条以减少窗体的创建和闪烁,并保留窗体的Z顺序。这允许快速切换布局。 |
| − | *'''Header popup menu''': | + | *'''Header popup menu|标题弹出菜单''': |
| − | ** | + | **锁定/解锁(禁用拖动) |
| − | ** | + | **标题位置(自动、左、上、右、下),这与布局一起保存/恢复 |
| − | ** | + | **合并(例如,在将停靠页面移动到布局后) |
| − | ** | + | **取消停靠(如果屏幕上没有地方取消停靠) |
| − | ** | + | **放大左侧、顶部、右侧、底部的边 |
| − | ** | + | **关闭 |
| − | ** | + | **选项 |
| − | *'''Page popup menu''': | + | *'''Page popup menu|页面弹出菜单''': |
| − | ** | + | **锁定/解锁(禁用拖动) |
| − | ** | + | **取消停靠(如果屏幕上没有地方取消停靠) |
| − | ** | + | **页面控件的选项卡位置(顶部、底部、左侧、右侧),这与布局一起保存/恢复 |
| − | ** | + | **将页面移动到左侧、右侧、最左侧、最右侧 |
| − | ** | + | **关闭 |
| − | ** | + | **选项 |
| − | * | + | *窗体可以设置为停靠站点。然后它们可以在一侧停靠。但它们本身不能被停靠。 |
| − | * | + | *关闭按钮自动保存布局 |
| − | * | + | *强大的功能来改变布局。您可以使用拖放来移动窗体,并且可以在一次操作中取消停靠和停靠。有函数可以放大窗体并缩小其他窗体。这些函数也可以通过标题弹出菜单使用。见下文。 |
| − | * | + | *有一个IDE包可以使Lazarus IDE可停靠。它被称为anchordockingdsgn.lpk。请确保只安装一个停靠包。不要同时安装easydockmgr! |
| − | === | + | ===待办事项=== |
| − | * | + | *设计时包:将所有布局文件添加到菜单中 |
| − | * | + | *简单的方法,在设计时使窗体可停靠(即无需编写任何代码) |
| − | * | + | *最小化按钮和隐藏 |
| − | * | + | *再次显示时:恢复默认布局 |
| − | * | + | *页面的关闭按钮 |
| − | * | + | *在LCL中实现自动菜单合并(当两个带有主菜单的窗体停靠时)。 |
| − | == | + | ==使用方法一(为Lazarus IDE添加停靠支持)== |
| − | + | 如果您不喜欢Lazarus IDE的默认“单独窗口”外观,而更喜欢单窗口(例如RAD Studio™),您可以安装一个名为'''[[AnchorDockingDsgn]]'''的包(lazarus/components/anchordocking/design/anchordockingdsgn.lpk)。这个包使IDE窗口可停靠。 | |
| − | === | + | ===安装=== |
| − | + | 卸载任何其他停靠管理器(例如easydockmgrdsgn)。从Lazarus主菜单中选择“包” - “安装/卸载包”,并安装“anchordockingdsgn”包。 | |
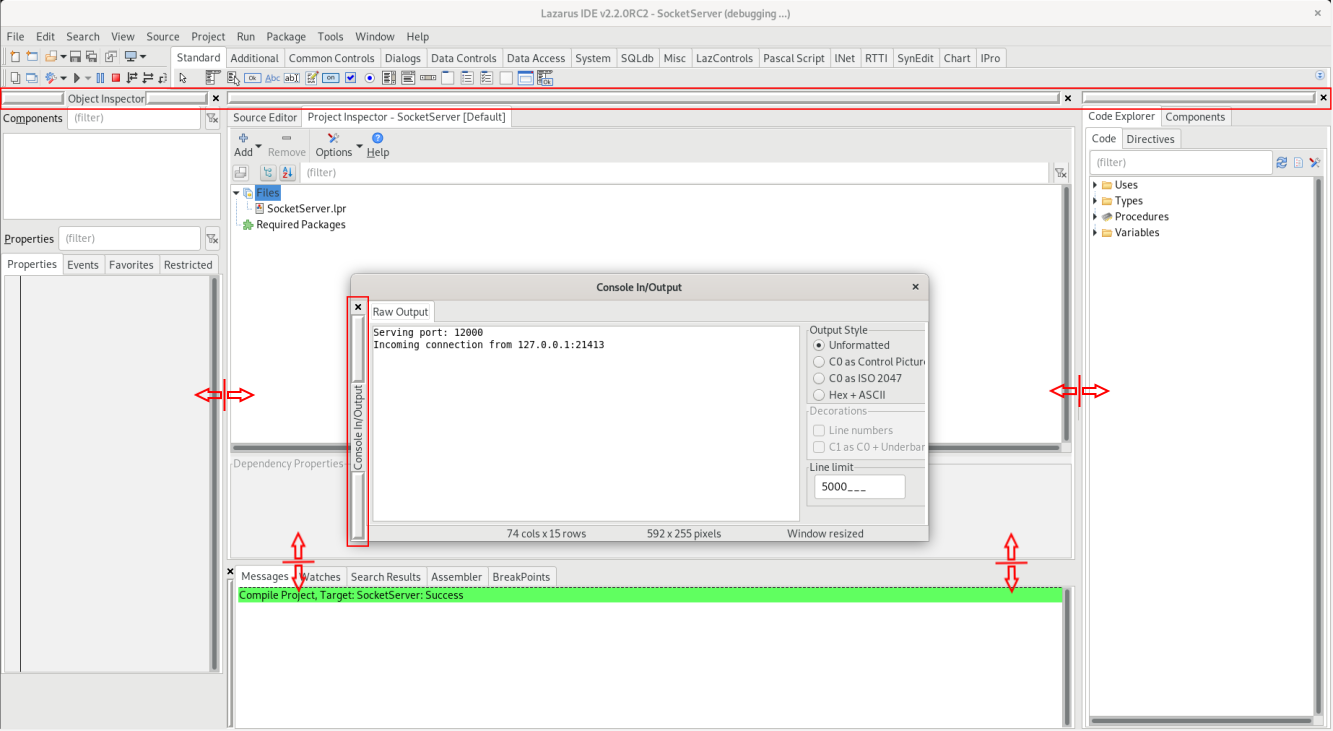
| − | + | 成功安装该包并重新启动IDE后,IDE将以默认停靠布局启动,如下所示。请注意,AnchorDocking标题和分割条已添加到IDE的所有可停靠窗口中。如果标题不可见,请参阅下面的“选项”部分以了解如何启用/禁用它们。 | |
[[File:2021-12-02_10_21_07-Debian_10.8_Buster_-_VMware_Workstation.png|1333px]] | [[File:2021-12-02_10_21_07-Debian_10.8_Buster_-_VMware_Workstation.png|1333px]] | ||
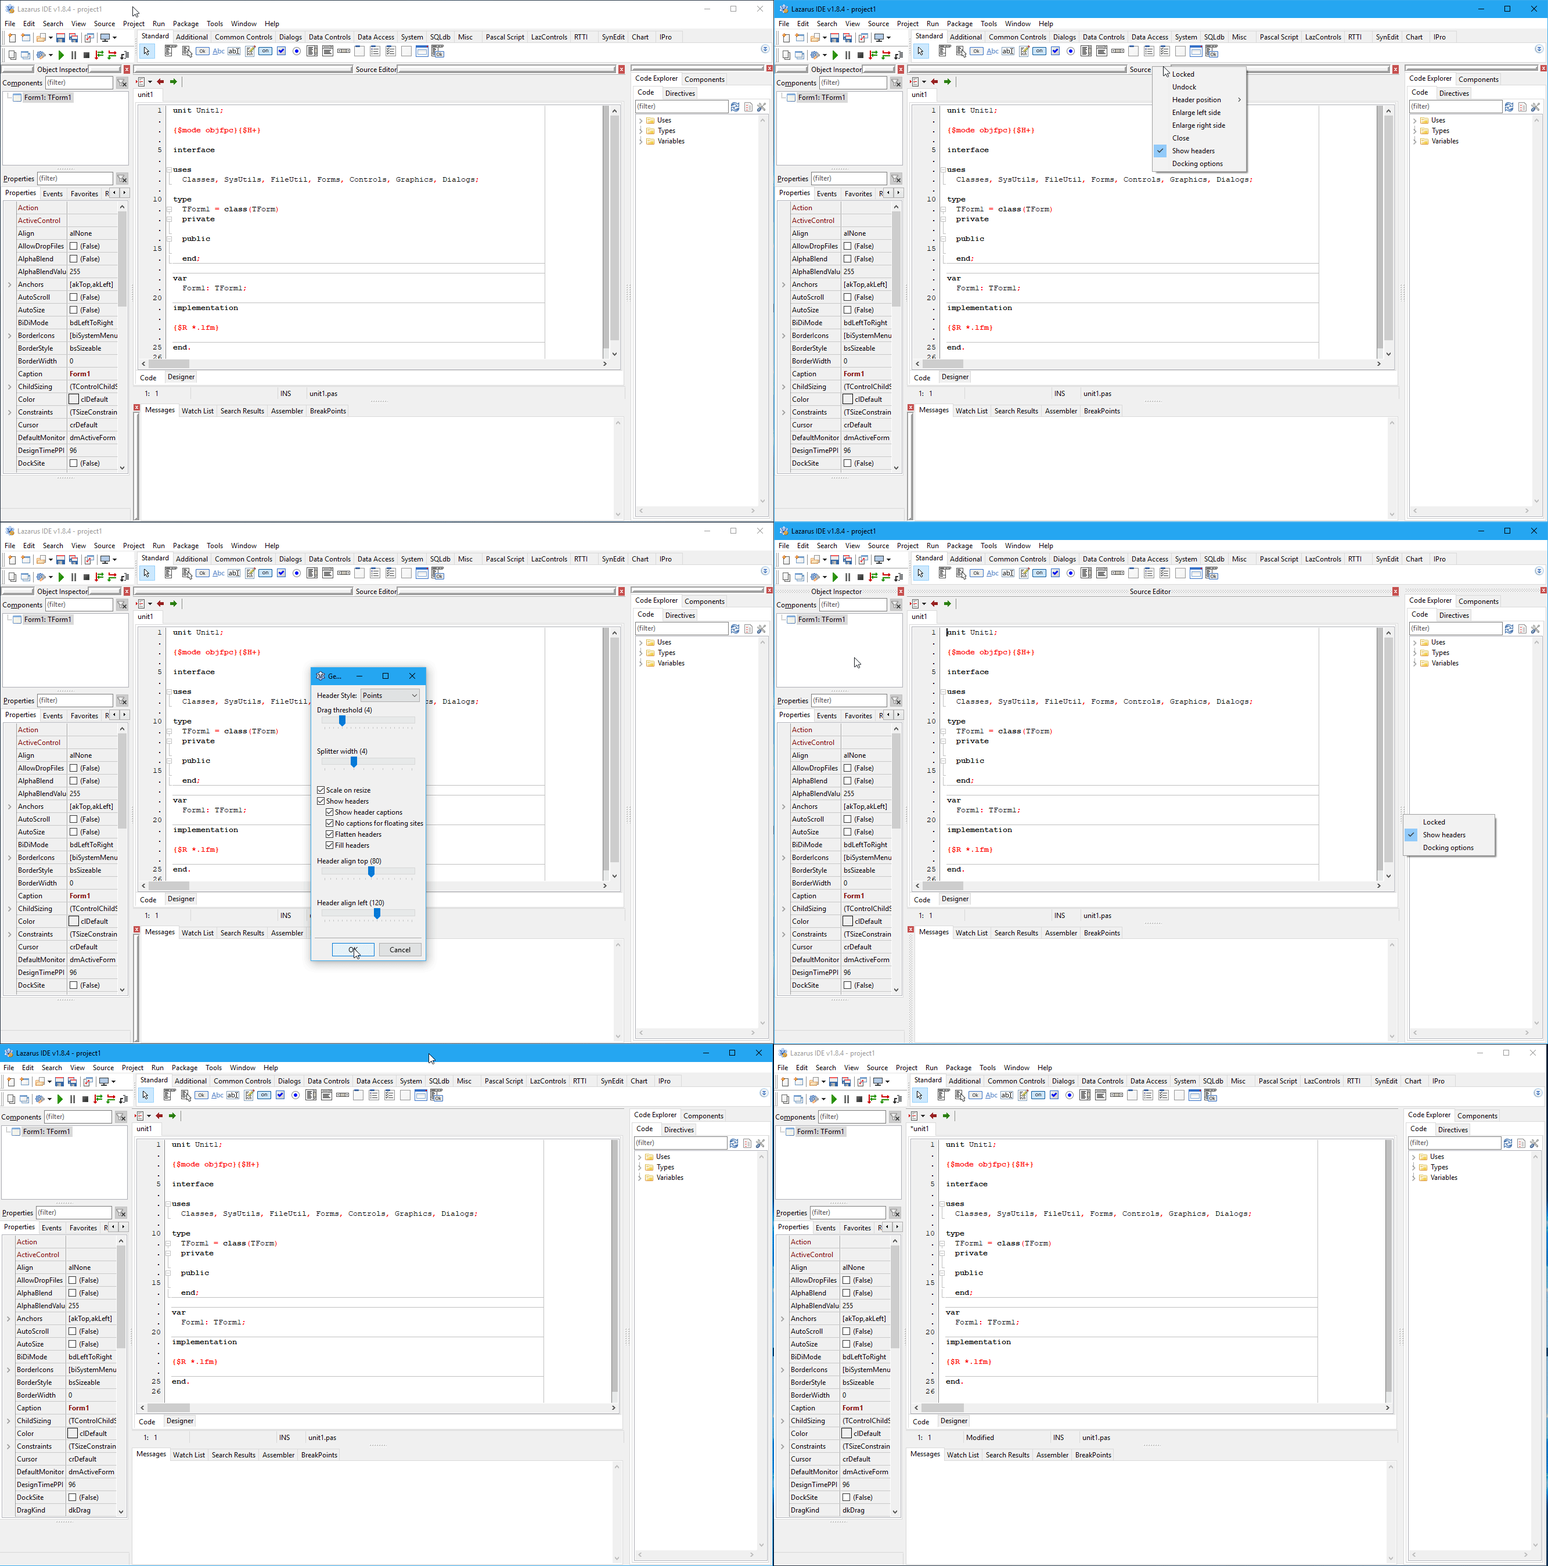
| − | + | 您可以通过抓取带有Anchordocking标题的可停靠窗口并将其拖放到其他位置来更改布局,或者通过添加到窗口边框的分割条来调整停靠窗口的大小。您还可以在标题上右键单击以获取其他选项,例如更改标题的外观,如下所示。 | |
| − | + | 您可以通过菜单项'''工具 / 将窗口布局保存为默认'''来保存布局。这将保存到~/.lazarus/anchordocklayout.xml,并在IDE启动时恢复。 | |
| − | + | 您还可以将布局保存到文件并在以后加载它们。 | |
| − | + | 从Lazarus 1.1开始,您可以传递命令行参数 | |
| − | + | ./lazarus --anchordocklayout=<filename> | |
| − | + | 通过右键单击标题可以进一步调整外观(如标题)。 | |
[[File:docking_headers.gif]] | [[File:docking_headers.gif]] | ||
| − | === | + | ===选项=== |
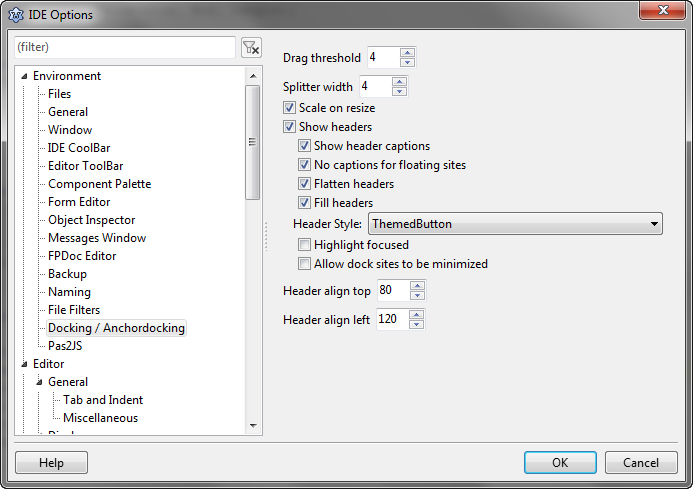
| − | + | 成功安装AnchorDockingDsgn包后,Lazarus选项对话框(“工具” - “选项” - “环境”)中添加了一个额外的配置菜单。 | |
[[File:anchordocking options.png]] | [[File:anchordocking options.png]] | ||
| − | ==== | + | ====调整大小时缩放==== |
| − | + | 当调整窗口大小时,所有内部停靠的窗体都将按相同的百分比缩放。 | |
| − | |||
| − | ==== | + | ====显示标题==== |
| − | + | 要停靠/取消停靠窗口,您需要启用此选项。 | |
| − | ==== | + | ====扁平化标题==== |
| − | + | 标题中没有3D框架。 | |
| − | ==== | + | ====标题顶部/左对齐==== |
| − | + | 标题根据这两个值自动放置在顶部或左侧: | |
| − | + | * 当(宽度/高度)*100<=HeaderAlignTop时,将标题移动到顶部,默认值为80 | |
| − | * | + | * 当(宽度/高度)*100>=HeaderAlignLeft时,将标题移动到左侧,默认值为120 |
| − | * | + | * 否则,将标题保留在当前位置。 |
| − | * | ||
| − | + | 这意味着标题默认情况下被放置在停靠控件的较小一侧。当控件被调整大小时,标题会切换到较小的一侧。 | |
| − | ==== | + | ====允许停靠站点被最小化==== |
| − | + | 添加了一个额外的最小化按钮,以便可以最小化站点。然后,它旁边的站点会获得更多空间。如果需要,可以轻松打开最小化的站点。 | |
| − | ==== | + | ====多行选项卡==== |
| − | + | Lazarus 2.2中添加了此功能。如果操作系统支持多行选项卡(如Windows),并且选项卡不多,则它们将显示在多行中。 | |
| − | ==== | + | ====浮动窗口在最顶层==== |
| − | + | Lazarus 2.2中添加了此功能。如果显示了未停靠的窗口,则将它们显示在主窗口的顶部。在自定义应用程序中,可以设置DockMaster.MainDockForm,然后所有浮动窗口都将显示在其顶部。如果未设置MainDockForm,则使用Application.MainForm。 | |
| − | == | + | ==使用方法二(为您自己的应用程序添加停靠支持)== |
| − | === | + | ===快速入门=== |
| − | + | 将包'''AnchorDocking'''添加到项目检查器中的必需包中。 | |
| − | + | 然后将单元'''AnchorDocking'''添加到您的主单元(包含主窗体的单元)的uses部分。 | |
| − | + | 在主窗体的FormCreate中添加: | |
<syntaxhighlight lang=pascal> | <syntaxhighlight lang=pascal> | ||
DockMaster.MakeDockSite(Self,[akBottom],admrpChild); | DockMaster.MakeDockSite(Self,[akBottom],admrpChild); | ||
</syntaxhighlight> | </syntaxhighlight> | ||
| − | + | 对于其他可停靠的窗体,将所有对''Show''和''ShowOnTop''的调用替换为 | |
<syntaxhighlight lang=pascal> | <syntaxhighlight lang=pascal> | ||
DockMaster.MakeDockable(Form1,true,true); | DockMaster.MakeDockable(Form1,true,true); | ||
</syntaxhighlight> | </syntaxhighlight> | ||
| − | + | 对于其他可停靠的窗体,将所有对''Visible:=true''的调用替换为 | |
<syntaxhighlight lang=pascal> | <syntaxhighlight lang=pascal> | ||
DockMaster.MakeDockable(Form1,true); | DockMaster.MakeDockable(Form1,true); | ||
</syntaxhighlight> | </syntaxhighlight> | ||
| − | + | 移除或注释掉所有''Hide''、''Visible:=false''、''WindowState:=''的调用。 | |
| − | === | + | ===先决条件=== |
| − | * | + | * 您的项目必须使用包''AnchorDocking''。 |
| − | * | + | * 所有可停靠的窗体都必须使用MakeDockable或MakeDockSite显示。不要使用''Show''、''BringToFront''、''ShowOnTop''、''Visible:=true''。当然,您可以有一些不可停靠的窗体,如提示或启动画面。 |
| − | * | + | * 所有可停靠的窗体都必须是可自由调整大小的,即没有约束,没有BorderStyle bsDialog。 |
| − | * | + | * 不要使用其他停靠系统。AnchorDocking与EasyDockMgr不兼容。 |
| − | === | + | ===使窗体可停靠=== |
| − | + | 有两种方法可以使窗体可停靠。您可以使用'''DockMaster.MakeDockable'''将窗体包装在一个停靠站点中。然后您的窗体可以完全自由地停靠和被停靠。您将对大部分窗体使用此方法,除了主窗体,因为gtk2和qt上仅支持主窗体。第二种方法是使用'''DockMaster.MakeDockSite'''。窗体可以停靠其他站点,但不能自身被停靠。您可能希望为主窗体使用''MakeDockSite''。 | |
| − | + | 对于大多数其他窗体,您可能想使用这个: | |
<syntaxhighlight lang=pascal> | <syntaxhighlight lang=pascal> | ||
| − | // | + | // 显示YourForm |
| − | // | + | // 如果尚未完成,将窗体包装在一个停靠站点中 |
DockMaster.MakeDockable(YourForm); | DockMaster.MakeDockable(YourForm); | ||
</syntaxhighlight> | </syntaxhighlight> | ||
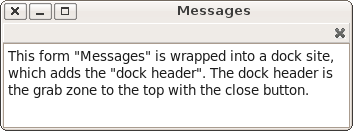
| − | + | 以下是一些使用'''DockMaster.MakeDockable'''使窗体可停靠后的示例: | |
[[Image:Docksite1.png]] [[Image:Docksite2.png]] | [[Image:Docksite1.png]] [[Image:Docksite2.png]] | ||
| − | + | 标题位置通常会自动完成,用户可以通过右键单击将其放置在四个边的任何一边。 | |
| − | === | + | ===示例:miniide1=== |
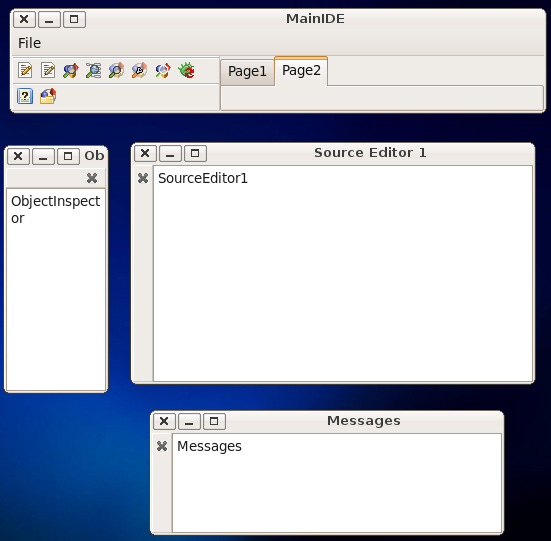
| − | + | 示例可以在''lazarus/components/anchordocking/miniide/miniide1.lpi''中找到。它有一个在''unit1.pas''单元中的''mainform'',具有一个作为停靠站点的主菜单和几个可停靠的窗体。 | |
[[Image:Anchordocking miniide1.png]] | [[Image:Anchordocking miniide1.png]] | ||
| − | === | + | ===将主窗体设置为停靠站点=== |
| − | + | 在TMainIDE.FormCreate中,主窗体'''MainIDE'''被转换为一个停靠站点: | |
<syntaxhighlight lang=pascal> | <syntaxhighlight lang=pascal> | ||
DockMaster.MakeDockSite(Self,[akBottom],admrpChild); | DockMaster.MakeDockSite(Self,[akBottom],admrpChild); | ||
</syntaxhighlight> | </syntaxhighlight> | ||
| − | + | 参数''[akBottom]''允许在MainIDE的底部停靠其他站点。参数''admrpChild''告诉DockMaster,当MainIDE被放大时,额外的空间将分配给停靠的站点。 | |
| − | + | 当用户将一个站点停靠到MainIDE的底部时,站点将被放置在MainIDE上(Site.Parent:=MainIDE),并设置Site.Align=alBottom。MainIDE上的其他控件必须与此兼容。例如,MainIDE有一个Align=alLeft的BtnPanel和一个Align=alClient的TNoteBook。请参阅[[Autosize_/_Layout#Align|此处]]了解Align的工作原理。 | |
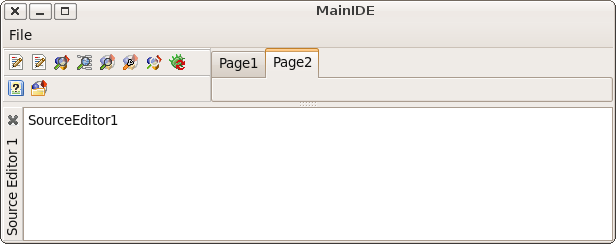
| − | + | DockMaster会自动添加一个分割条: | |
[[Image:Anchordocking miniide dockedse1.png]] | [[Image:Anchordocking miniide dockedse1.png]] | ||
| − | + | 一旦一个可停靠的窗体被停靠,其标题就会显示在停靠标题栏中。 | |
| − | ==== | + | ====自定义停靠站点的要求==== |
| − | + | 在没有任何内容停靠到自定义停靠站点之前,您的窗体可以像普通窗体一样做任何事情。但是,当一个站点停靠到它上面时,一些属性和方法需要特别注意: | |
| − | *AutoSize= | + | *AutoSize=true可能会导致无限循环。禁用它或重写DoAutoSize/CalculatePreferredSize并特别注意。 |
| − | * | + | *Constraints:DockMaster会清除最大Constraints,并在取消停靠时恢复它们。 |
| − | * | + | *锚定到对齐站点的子控件可能会重叠。请参阅[[Autosize_/_Layout#Align|此处]]了解Align的工作原理。 |
| − | * | + | *ChildSizing:间距属性(如LeftRightSpacing,TopBottomSpacing)可能会干扰停靠布局。 |
| − | === | + | ===按名称创建所有其他窗体的过程=== |
| − | + | MainIDE设置了'''DockMaster.OnCreateControl'''事件,以允许DockMaster按名称创建窗体。这是恢复布局所必需的。 | |
<syntaxhighlight lang=pascal> | <syntaxhighlight lang=pascal> | ||
DockMaster.OnCreateControl:=@DockMasterCreateControl; | DockMaster.OnCreateControl:=@DockMasterCreateControl; | ||
| Line 220: | Line 218: | ||
begin | begin | ||
| − | // | + | // 首先检查窗体是否已存在 |
| − | // | + | // LCL Screen有一个所有现有窗体的列表。 |
| − | // | + | // 注意:请记住,LCL只允许窗体名称使用标准的Pascal标识符,并且不区分大小写 |
| − | |||
AControl:=Screen.FindForm(aName); | AControl:=Screen.FindForm(aName); | ||
if AControl<>nil then begin | if AControl<>nil then begin | ||
| − | // | + | // 如果它已经存在,只是根据请求禁用自动调整大小 |
if DoDisableAutoSizing then | if DoDisableAutoSizing then | ||
AControl.DisableAutoSizing; | AControl.DisableAutoSizing; | ||
exit; | exit; | ||
end; | end; | ||
| − | // | + | // 如果窗体尚不存在,则创建它 |
if aName='CodeExplorer' then | if aName='CodeExplorer' then | ||
CreateForm('Code Explorer',Bounds(700,230,100,250)) | CreateForm('Code Explorer',Bounds(700,230,100,250)) | ||
| Line 240: | Line 237: | ||
</syntaxhighlight> | </syntaxhighlight> | ||
| − | + | 创建一个窗体可以像这样简单: | |
<syntaxhighlight lang=pascal> | <syntaxhighlight lang=pascal> | ||
MyForm:=TMyForm.Create(Self); | MyForm:=TMyForm.Create(Self); | ||
| Line 247: | Line 244: | ||
</syntaxhighlight> | </syntaxhighlight> | ||
| − | + | 但当然,您可以在那里放置所有类型的初始化代码。 | |
| − | + | ''DisableAutoSizing''减少了闪烁。确保您的窗体'''Visible'''属性设置为'''false'''。 | |
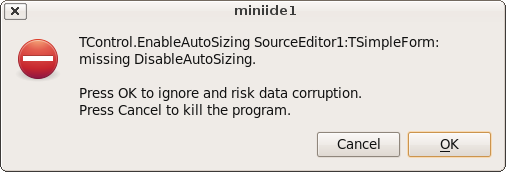
| − | + | 如果设置了参数'''DoDisableAutoSizing'''为''true'',请记得为窗体调用'''DisableAutoSizing''',因为''Disable-''和''EnableAutosizing''调用必须平衡。如果您错过了''DisableAutosizing'',LCL稍后会引发异常: | |
| − | + | TControl.EnableAutoSizing SourceEditor1:TSimpleForm: missing DisableAutoSizing | |
[[Image:MissingDisableAutoSizing.png]] | [[Image:MissingDisableAutoSizing.png]] | ||
| − | + | 如果您调用'''DisableAutoSizing'''过多,您的窗体将不会出现和/或无法正确调整大小,因为LCL正在等待永远不会到来的''EnableAutoSizing''调用。 | |
| − | === | + | ===显示窗体=== |
| − | + | 当要显示一个窗体时,您可能使用过类似'''MyForm.Show'''的东西。现在您应该使用 | |
<syntaxhighlight lang=pascal> | <syntaxhighlight lang=pascal> | ||
DockMaster.MakeDockable(MyForm); | DockMaster.MakeDockable(MyForm); | ||
</syntaxhighlight> | </syntaxhighlight> | ||
| − | + | 这将把MyForm包装在一个停靠站点中并显示它。它足够聪明,可以判断窗体是否已经被包装在一个停靠站点中。 | |
| − | + | 如果您设置了'''DockMaster.OnCreateControl'''事件,您可以使用这个: | |
<syntaxhighlight lang=pascal> | <syntaxhighlight lang=pascal> | ||
DockMaster.ShowControl('MyForm',true); | DockMaster.ShowControl('MyForm',true); | ||
</syntaxhighlight> | </syntaxhighlight> | ||
| − | === | + | ===通过代码手动停靠=== |
| − | + | 使用过程'''DockMaster.ManualDock'''将一个站点停靠到另一个站点或停靠到另一个站点内部。 | |
<syntaxhighlight lang=pascal> | <syntaxhighlight lang=pascal> | ||
| Line 280: | Line 277: | ||
</syntaxhighlight> | </syntaxhighlight> | ||
| − | *'''SrcSite''' | + | *'''SrcSite'''是要停靠的站点。如果SrcSite已经被停靠,它将首先被取消停靠。 |
| − | *'''TargetSite''' | + | *'''TargetSite'''是SrcSite将被停靠到或停靠为邻居的站点。 |
| − | *'''TargetControl''' | + | *'''TargetControl'''指定停靠为邻居(=nil)、作为内部邻居(=TargetSide)或在页面前面(=一个TAnchorDockPage)。 |
| + | ===通过代码手动取消停靠=== | ||
| − | + | 使用过程'''DockMaster.ManualFloat'''将一个站点从其邻居中取消停靠并创建一个浮动的顶层窗体。嵌入的控件仍然嵌入在TAnchorDockHostSite中。 | |
| − | |||
| − | |||
<syntaxhighlight lang=pascal> | <syntaxhighlight lang=pascal> | ||
| Line 293: | Line 289: | ||
</syntaxhighlight> | </syntaxhighlight> | ||
| − | + | 您可以提供一个TAnchorDockHostSite或嵌入在TAnchorDockHostSite中的控件(例如,使用MakeDockable制作的窗体)作为参数。站点将被放置在相同的屏幕位置。 | |
| − | === | + | ===保存布局=== |
| − | + | DockMaster允许将当前布局保存到TConfigStorage。miniide示例使用了xml版本: | |
<syntaxhighlight lang=pascal> | <syntaxhighlight lang=pascal> | ||
| Line 305: | Line 301: | ||
begin | begin | ||
try | try | ||
| − | // | + | // 创建一个新的xml配置文件 |
XMLConfig:=TXMLConfigStorage.Create(Filename,false); | XMLConfig:=TXMLConfigStorage.Create(Filename,false); | ||
try | try | ||
| − | // | + | // 保存所有窗体的当前布局 |
DockMaster.SaveLayoutToConfig(XMLConfig); | DockMaster.SaveLayoutToConfig(XMLConfig); | ||
XMLConfig.WriteToDisk; | XMLConfig.WriteToDisk; | ||
| Line 316: | Line 312: | ||
except | except | ||
on E: Exception do begin | on E: Exception do begin | ||
| − | MessageDlg(' | + | MessageDlg('错误', |
| − | ' | + | '将布局保存到文件'+Filename+'时出错:'#13+E.Message,mtError, |
[mbCancel],0); | [mbCancel],0); | ||
end; | end; | ||
| Line 324: | Line 320: | ||
</syntaxhighlight> | </syntaxhighlight> | ||
| − | === | + | ===加载布局=== |
<syntaxhighlight lang=pascal> | <syntaxhighlight lang=pascal> | ||
| Line 332: | Line 328: | ||
begin | begin | ||
try | try | ||
| − | // | + | // 加载xml配置文件 |
XMLConfig:=TXMLConfigStorage.Create(Filename,True); | XMLConfig:=TXMLConfigStorage.Create(Filename,True); | ||
try | try | ||
| − | // | + | // 恢复布局 |
| − | // | + | // 这将关闭不需要的窗体,并为所有需要的窗体调用OnCreateControl |
DockMaster.LoadLayoutFromConfig(XMLConfig); | DockMaster.LoadLayoutFromConfig(XMLConfig); | ||
finally | finally | ||
| Line 343: | Line 339: | ||
except | except | ||
on E: Exception do begin | on E: Exception do begin | ||
| − | MessageDlg(' | + | MessageDlg('错误', |
| − | ' | + | '从文件'+Filename+'加载布局时出错:'#13+E.Message,mtError, |
[mbCancel],0); | [mbCancel],0); | ||
end; | end; | ||
| Line 351: | Line 347: | ||
</syntaxhighlight> | </syntaxhighlight> | ||
| − | === | + | ===放大/缩小=== |
| − | + | 锚点停靠管理器可以放大/缩小停靠的邻居窗体。这可以通过停靠标题栏的弹出菜单或使用函数'''DockMaster.ManualEnlarge'''在代码中完成: | |
<syntaxhighlight lang=pascal> | <syntaxhighlight lang=pascal> | ||
| Line 359: | Line 355: | ||
</syntaxhighlight> | </syntaxhighlight> | ||
| − | + | Site是一个子站点,Side是要扩展的Site的侧边。如果只想测试是否可以放大,则将OnlyCheckIfPossible设置为true。 | |
| − | === | + | ===放大一个,缩小另一个=== |
| − | + | 缩小邻居“对象检查器”,放大“消息”:右键单击“消息”的标题栏,然后点击“放大右侧”。两个分割条将被调整大小。 | |
| − | [[Image:Anchordocking before enlarge1.png]] | + | [[Image:Anchordocking before enlarge1.png]] 放大“消息”到右侧: [[Image:Anchordocking after enlarge1.png]] |
| − | === | + | ===放大一个,缩小多个=== |
| − | + | 缩小一侧的分割条,放大两个相邻的分割条,旋转后面的分割条,放大控件,缩小旋转分割条上的控件。右键单击“源代码编辑器1”的标题栏,然后点击“放大底部”。 | |
| − | [[Image:Anchordocking before enlarge2.png]] | + | [[Image:Anchordocking before enlarge2.png]] 变为 [[Image:Anchordocking after enlarge2.png]] |
| − | === | + | ===一般停靠选项=== |
| − | + | AnchorDocking包提供了一个对话框来设置DockMaster的一些属性。该对话框位于AnchorDockOptionsDlg单元中,您可以简单地使用它: | |
<syntaxhighlight lang=pascal> | <syntaxhighlight lang=pascal> | ||
uses ... AnchorDockOptionsDlg; | uses ... AnchorDockOptionsDlg; | ||
| Line 387: | Line 383: | ||
</syntaxhighlight> | </syntaxhighlight> | ||
| − | + | 这将向停靠标题栏和页面的弹出菜单中添加一个新的菜单项“停靠选项”。 | |
| − | == | + | ==为什么使用锚点而不是对齐?== |
| − | + | 锚点允许创建任何可能的矩形布局。对齐是有限制的。对齐与面板结合使用理论上可以创建很多布局,但仍然不是全部。而且,一些操作(如放大/缩小)使用对齐/面板比使用锚点更复杂。对齐对于少数窗体来说工作得很好,但停靠的窗体越多,对齐的缺点就越明显。 | |
| − | === | + | ===使用对齐可以创建的布局=== |
| − | + | 对齐只能创建以下布局: | |
[[Image:Anchordocking align layout1.png]] | [[Image:Anchordocking align layout1.png]] | ||
| − | + | alTop控件始终位于顶部,填满整个水平宽度。这是因为LCL首先将所有控件与alTop对齐,然后是alBottom、alLeft、alRight,最后是alClient。 | |
| − | === | + | ===使用对齐和面板可以创建的布局=== |
| − | + | 通过使用隐藏的面板,可以嵌套对齐布局。然后可以创建任何可以递归地分成两半的布局。例如,您可以创建: | |
[[Image:Anchordocking align panels layout1.png]] | [[Image:Anchordocking align panels layout1.png]] | ||
| − | + | 这只需要一个隐藏的面板。 | |
| − | === | + | ===更改布局=== |
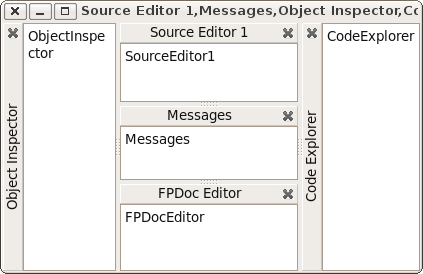
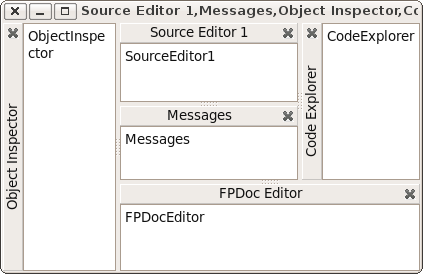
| − | + | 现在用户想要水平放大“FPDocEditor”(并缩小“CodeExplorer”)。使用“AnchorDocking”,您只需右键单击“FPDocEditor”的标题栏,然后点击“放大右侧”。 | |
[[Image:Anchordocking align panels layout2.png]] | [[Image:Anchordocking align panels layout2.png]] | ||
| − | + | 其他停靠引擎至少需要两个面板。一个用于“SrcEditor”、“Messages”、“FPDocEdit”、“CodeExpl”,另一个用于“SrcEdit”和“Messages”。大多数停靠布局器甚至不提供以这种方式更改布局的简单方法。允许这种布局更改的算法必须分析整个结构,就好像没有面板一样,并且必须重新分配很多东西。基本上,该算法必须执行与锚点停靠算法相同的操作,但还需要将布局转换为对齐加上隐藏面板的额外工作。 | |
| − | === | + | ===使用对齐和面板无法创建的布局=== |
| − | + | 现在用户想要水平放大“源代码编辑器1”(并缩小“对象检查器”): | |
[[Image:Anchordocking impossible with align panels1.png]] | [[Image:Anchordocking impossible with align panels1.png]] | ||
| − | + | 这个布局使用对齐和面板是无法实现的,因为您无法将其切成两半。与以下情况相同: | |
[[Image:Anchordocking impossible with align panels2.png]] | [[Image:Anchordocking impossible with align panels2.png]] | ||
| − | === | + | ===结论=== |
| − | + | 使用隐藏面板的对齐允许您轻松地创建一个简单的停靠管理器,适用于少数窗体,但它始终会限制用户。对齐对于行和列布局很有用,但对于表格布局则不然。锚点停靠甚至适用于复杂的窗体。 | |
| − | == | + | ==旧版/已弃用的锚点停靠== |
| − | === | + | ===创建一个TLazDockingManager=== |
<syntaxhighlight lang=pascal> | <syntaxhighlight lang=pascal> | ||
DockingManager:=TLazDockingManager.Create(Self); | DockingManager:=TLazDockingManager.Create(Self); | ||
</syntaxhighlight> | </syntaxhighlight> | ||
| − | + | 作为参数的Self仅用作Owner。这意味着,当主窗体被释放时,DockingManager也会被释放。您可以使用''nil''并自行释放DockingManager。 | |
| − | === | + | ===可选:加载配置=== |
| − | + | 您可以从磁盘加载用户配置。 | |
<syntaxhighlight lang=pascal> | <syntaxhighlight lang=pascal> | ||
Config:=TXMLConfigStorage.Create('config.xml',true); | Config:=TXMLConfigStorage.Create('config.xml',true); | ||
| Line 443: | Line 439: | ||
Config.Free; | Config.Free; | ||
</syntaxhighlight> | </syntaxhighlight> | ||
| − | + | 这将加载文件''config.xml''。该配置可以使用SaveToConfig函数创建。见下文。 | |
| − | === | + | ===使窗体/控件可停靠=== |
| − | + | 为每个应该可停靠的窗体/控件创建一个TLazControlDocker | |
<syntaxhighlight lang=pascal> | <syntaxhighlight lang=pascal> | ||
ControlDocker1:=TLazControlDocker.Create(Self); | ControlDocker1:=TLazControlDocker.Create(Self); | ||
| Line 454: | Line 450: | ||
</syntaxhighlight> | </syntaxhighlight> | ||
| − | === | + | ===可选:将用户配置保存到磁盘=== |
| − | + | 当程序关闭时,您可以将用户配置保存到磁盘 | |
<syntaxhighlight lang=pascal> | <syntaxhighlight lang=pascal> | ||
Config:=TXMLConfigStorage.Create('config.xml',true); | Config:=TXMLConfigStorage.Create('config.xml',true); | ||
| Line 464: | Line 460: | ||
</syntaxhighlight> | </syntaxhighlight> | ||
| − | == | + | ==另请参阅== |
| − | * [[AnchorDockingDsgn]] | + | * [[AnchorDockingDsgn]] 在Lazarus IDE中的AnchorDocking |
| − | * [[Anchor Docking Step by step example | Anchor Docking: | + | * [[Anchor Docking Step by step example | Anchor Docking: 逐步示例]] |
| − | * [[Docking]] | + | * [[Docking]] 停靠一般信息 |
| − | * [[EasyDockingManager]] - | + | * [[EasyDockingManager]] - 一个具有更简单布局引擎和更少选项的停靠实现替代方案。 |
[[Category:Docking]] | [[Category:Docking]] | ||
Latest revision as of 09:57, 7 May 2024
│ English (en) │ русский (ru) │ 中文(中国大陆) (zh_CN) │
关于停靠的一般信息,请参阅Docking。
概述
停靠允许您将窗体组合起来,或将控件视为窗体。您可以使用鼠标将窗体拖放停靠在一起或取消停靠(拆分)它们。基本的拖动、停靠和取消停靠功能由LCL提供。但您需要停靠管理器来添加分割条和抓取区域,以及保存和恢复布局。
锚点停靠自0.9.29版本起在anchordocking.lpk包中实现,用于您自己的Lazarus应用程序,如果您希望使Lazarus IDE窗口可停靠,则使用AnchorDockingDsgn.lpk。它易于使用,并提供了许多早期停靠包中不可用的功能和选项。
您可以在以下位置找到代码示例:components/anchordocking/miniide/miniide1.lpi
这意味着早期的TLazDockingManager和LDockCtrl单元已过时,现在已被弃用。
特色
- Drag and dock | 拖放停靠: 添加了标题,可以拖动以用鼠标停靠控件。预览矩形将显示控件停靠的位置和方式。
- Any layout | 任何布局: 通过使用LCL的锚点,几乎可以实现任何布局。您可以停靠到左、右、上、下、内部或外部,或像TPageControl中的页面一样。您可以通过弹出菜单放大停靠的控件。无需取消停靠整个布局。
- What you see is how it is structured|所见即所得: 没有隐藏的面板来对齐行和列中的控件。锚点停靠确保窗体不重叠。
- Splitters | 分割条会自动插入停靠的窗体之间,以允许调整大小。
- Page docking | 页面停靠. 窗体不仅可以停靠到左/右/上/下,还可以停靠到页面中。将自动创建TPageControl以实现原生外观和感觉。页面可以包含任意停靠的窗体,包括分页停靠的窗体,允许嵌套页面和布局。当页面被取消停靠时,页面控件会自动删除。您可以拖放选项卡或使用弹出菜单移动页面。
- Easy use|易于使用: 通过一行代码,您可以使窗体或控件可停靠。只需为它们提供唯一的名称。
- 不仅窗体,任何TWinControl都可以被设置为可停靠。
- 可以保存/加载布局。停靠控件的布局信息被存储,即使应用程序获得更多的可停靠控件或移除了一些控件,旧的布局文件仍然可以工作。信息存储在LCL的TConfigStorage抽象类中。因此,您可以使用例如TXMLConfigStorage将布局存储在xml文件中,或者编写您自己的存储来将布局存储在任何您想要的位置。
- 每个停靠的窗体都被放入一个停靠站点,提供一个可选的标题。标题显示停靠窗体的标题,并包含一个关闭按钮。您可以拖动标题来拖动窗体、取消停靠或将其停靠到另一个位置。标题可以位于四个边的任何一边,默认情况下会自动移动到较小的一边以节省空间。您可以自定义此设置。标题显示一个可自定义的提示,允许读取长标题。
- 当停靠站点被调整大小时,子站点会自动缩放。您可以关闭此功能。
- Preserve size of forms|保持窗体大小. 例如,当将窗体停靠到站点的左侧时,停靠窗体的宽度保持不变。其他边和解除停靠也是如此。
- Flickerless|无闪烁: 恢复时尝试重用现有的站点和分割条以减少窗体的创建和闪烁,并保留窗体的Z顺序。这允许快速切换布局。
- Header popup menu|标题弹出菜单:
- 锁定/解锁(禁用拖动)
- 标题位置(自动、左、上、右、下),这与布局一起保存/恢复
- 合并(例如,在将停靠页面移动到布局后)
- 取消停靠(如果屏幕上没有地方取消停靠)
- 放大左侧、顶部、右侧、底部的边
- 关闭
- 选项
- Page popup menu|页面弹出菜单:
- 锁定/解锁(禁用拖动)
- 取消停靠(如果屏幕上没有地方取消停靠)
- 页面控件的选项卡位置(顶部、底部、左侧、右侧),这与布局一起保存/恢复
- 将页面移动到左侧、右侧、最左侧、最右侧
- 关闭
- 选项
- 窗体可以设置为停靠站点。然后它们可以在一侧停靠。但它们本身不能被停靠。
- 关闭按钮自动保存布局
- 强大的功能来改变布局。您可以使用拖放来移动窗体,并且可以在一次操作中取消停靠和停靠。有函数可以放大窗体并缩小其他窗体。这些函数也可以通过标题弹出菜单使用。见下文。
- 有一个IDE包可以使Lazarus IDE可停靠。它被称为anchordockingdsgn.lpk。请确保只安装一个停靠包。不要同时安装easydockmgr!
待办事项
- 设计时包:将所有布局文件添加到菜单中
- 简单的方法,在设计时使窗体可停靠(即无需编写任何代码)
- 最小化按钮和隐藏
- 再次显示时:恢复默认布局
- 页面的关闭按钮
- 在LCL中实现自动菜单合并(当两个带有主菜单的窗体停靠时)。
使用方法一(为Lazarus IDE添加停靠支持)
如果您不喜欢Lazarus IDE的默认“单独窗口”外观,而更喜欢单窗口(例如RAD Studio™),您可以安装一个名为AnchorDockingDsgn的包(lazarus/components/anchordocking/design/anchordockingdsgn.lpk)。这个包使IDE窗口可停靠。
安装
卸载任何其他停靠管理器(例如easydockmgrdsgn)。从Lazarus主菜单中选择“包” - “安装/卸载包”,并安装“anchordockingdsgn”包。
成功安装该包并重新启动IDE后,IDE将以默认停靠布局启动,如下所示。请注意,AnchorDocking标题和分割条已添加到IDE的所有可停靠窗口中。如果标题不可见,请参阅下面的“选项”部分以了解如何启用/禁用它们。
您可以通过抓取带有Anchordocking标题的可停靠窗口并将其拖放到其他位置来更改布局,或者通过添加到窗口边框的分割条来调整停靠窗口的大小。您还可以在标题上右键单击以获取其他选项,例如更改标题的外观,如下所示。
您可以通过菜单项工具 / 将窗口布局保存为默认来保存布局。这将保存到~/.lazarus/anchordocklayout.xml,并在IDE启动时恢复。
您还可以将布局保存到文件并在以后加载它们。
从Lazarus 1.1开始,您可以传递命令行参数
./lazarus --anchordocklayout=<filename>
通过右键单击标题可以进一步调整外观(如标题)。
选项
成功安装AnchorDockingDsgn包后,Lazarus选项对话框(“工具” - “选项” - “环境”)中添加了一个额外的配置菜单。
调整大小时缩放
当调整窗口大小时,所有内部停靠的窗体都将按相同的百分比缩放。
显示标题
要停靠/取消停靠窗口,您需要启用此选项。
扁平化标题
标题中没有3D框架。
标题顶部/左对齐
标题根据这两个值自动放置在顶部或左侧:
- 当(宽度/高度)*100<=HeaderAlignTop时,将标题移动到顶部,默认值为80
- 当(宽度/高度)*100>=HeaderAlignLeft时,将标题移动到左侧,默认值为120
- 否则,将标题保留在当前位置。
这意味着标题默认情况下被放置在停靠控件的较小一侧。当控件被调整大小时,标题会切换到较小的一侧。
允许停靠站点被最小化
添加了一个额外的最小化按钮,以便可以最小化站点。然后,它旁边的站点会获得更多空间。如果需要,可以轻松打开最小化的站点。
多行选项卡
Lazarus 2.2中添加了此功能。如果操作系统支持多行选项卡(如Windows),并且选项卡不多,则它们将显示在多行中。
浮动窗口在最顶层
Lazarus 2.2中添加了此功能。如果显示了未停靠的窗口,则将它们显示在主窗口的顶部。在自定义应用程序中,可以设置DockMaster.MainDockForm,然后所有浮动窗口都将显示在其顶部。如果未设置MainDockForm,则使用Application.MainForm。
使用方法二(为您自己的应用程序添加停靠支持)
快速入门
将包AnchorDocking添加到项目检查器中的必需包中。
然后将单元AnchorDocking添加到您的主单元(包含主窗体的单元)的uses部分。
在主窗体的FormCreate中添加:
DockMaster.MakeDockSite(Self,[akBottom],admrpChild);
对于其他可停靠的窗体,将所有对Show和ShowOnTop的调用替换为
DockMaster.MakeDockable(Form1,true,true);
对于其他可停靠的窗体,将所有对Visible:=true的调用替换为
DockMaster.MakeDockable(Form1,true);
移除或注释掉所有Hide、Visible:=false、WindowState:=的调用。
先决条件
- 您的项目必须使用包AnchorDocking。
- 所有可停靠的窗体都必须使用MakeDockable或MakeDockSite显示。不要使用Show、BringToFront、ShowOnTop、Visible:=true。当然,您可以有一些不可停靠的窗体,如提示或启动画面。
- 所有可停靠的窗体都必须是可自由调整大小的,即没有约束,没有BorderStyle bsDialog。
- 不要使用其他停靠系统。AnchorDocking与EasyDockMgr不兼容。
使窗体可停靠
有两种方法可以使窗体可停靠。您可以使用DockMaster.MakeDockable将窗体包装在一个停靠站点中。然后您的窗体可以完全自由地停靠和被停靠。您将对大部分窗体使用此方法,除了主窗体,因为gtk2和qt上仅支持主窗体。第二种方法是使用DockMaster.MakeDockSite。窗体可以停靠其他站点,但不能自身被停靠。您可能希望为主窗体使用MakeDockSite。 对于大多数其他窗体,您可能想使用这个:
// 显示YourForm
// 如果尚未完成,将窗体包装在一个停靠站点中
DockMaster.MakeDockable(YourForm);
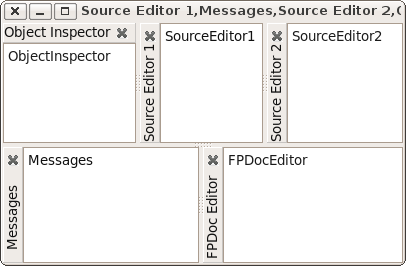
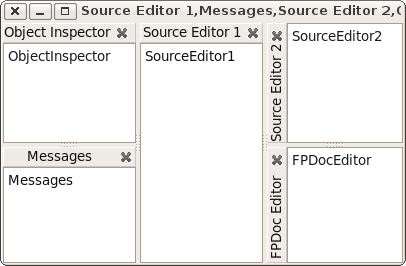
以下是一些使用DockMaster.MakeDockable使窗体可停靠后的示例:
标题位置通常会自动完成,用户可以通过右键单击将其放置在四个边的任何一边。
示例:miniide1
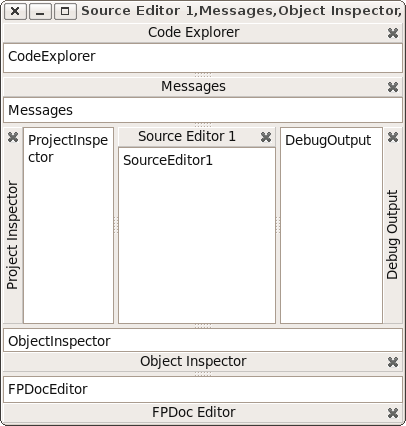
示例可以在lazarus/components/anchordocking/miniide/miniide1.lpi中找到。它有一个在unit1.pas单元中的mainform,具有一个作为停靠站点的主菜单和几个可停靠的窗体。
将主窗体设置为停靠站点
在TMainIDE.FormCreate中,主窗体MainIDE被转换为一个停靠站点:
DockMaster.MakeDockSite(Self,[akBottom],admrpChild);
参数[akBottom]允许在MainIDE的底部停靠其他站点。参数admrpChild告诉DockMaster,当MainIDE被放大时,额外的空间将分配给停靠的站点。
当用户将一个站点停靠到MainIDE的底部时,站点将被放置在MainIDE上(Site.Parent:=MainIDE),并设置Site.Align=alBottom。MainIDE上的其他控件必须与此兼容。例如,MainIDE有一个Align=alLeft的BtnPanel和一个Align=alClient的TNoteBook。请参阅此处了解Align的工作原理。
DockMaster会自动添加一个分割条:
一旦一个可停靠的窗体被停靠,其标题就会显示在停靠标题栏中。
自定义停靠站点的要求
在没有任何内容停靠到自定义停靠站点之前,您的窗体可以像普通窗体一样做任何事情。但是,当一个站点停靠到它上面时,一些属性和方法需要特别注意:
- AutoSize=true可能会导致无限循环。禁用它或重写DoAutoSize/CalculatePreferredSize并特别注意。
- Constraints:DockMaster会清除最大Constraints,并在取消停靠时恢复它们。
- 锚定到对齐站点的子控件可能会重叠。请参阅此处了解Align的工作原理。
- ChildSizing:间距属性(如LeftRightSpacing,TopBottomSpacing)可能会干扰停靠布局。
按名称创建所有其他窗体的过程
MainIDE设置了DockMaster.OnCreateControl事件,以允许DockMaster按名称创建窗体。这是恢复布局所必需的。
DockMaster.OnCreateControl:=@DockMasterCreateControl;
procedure TMainIDE.DockMasterCreateControl(Sender: TObject; aName: string; var
  AControl: TControl; DoDisableAutoSizing: boolean);

  procedure CreateForm(Caption: string; NewBounds: TRect);
  begin
    AControl:=CreateSimpleForm(aName,Caption,NewBounds,DoDisableAutoSizing);
  end;

begin
  // 首先检查窗体是否已存在
  // LCL Screen有一个所有现有窗体的列表。
  // 注意:请记住,LCL只允许窗体名称使用标准的Pascal标识符,并且不区分大小写
  AControl:=Screen.FindForm(aName);
  if AControl<>nil then begin
    // 如果它已经存在,只是根据请求禁用自动调整大小
    if DoDisableAutoSizing then
      AControl.DisableAutoSizing;
    exit;
  end;
  // 如果窗体尚不存在,则创建它
  if aName='CodeExplorer' then
    CreateForm('Code Explorer',Bounds(700,230,100,250))
  ...
  else if aName='DebugOutput' then
    CreateForm('Debug Output',Bounds(400,400,350,150));
end;
创建一个窗体可以像这样简单:
MyForm:=TMyForm.Create(Self);
if DoDisableAutoSizing then
  MyForm.DisableAutoSizing;
但当然,您可以在那里放置所有类型的初始化代码。
DisableAutoSizing减少了闪烁。确保您的窗体Visible属性设置为false。
如果设置了参数DoDisableAutoSizing为true,请记得为窗体调用DisableAutoSizing,因为Disable-和EnableAutosizing调用必须平衡。如果您错过了DisableAutosizing,LCL稍后会引发异常: TControl.EnableAutoSizing SourceEditor1:TSimpleForm: missing DisableAutoSizing
如果您调用DisableAutoSizing过多,您的窗体将不会出现和/或无法正确调整大小,因为LCL正在等待永远不会到来的EnableAutoSizing调用。
显示窗体
当要显示一个窗体时,您可能使用过类似MyForm.Show的东西。现在您应该使用
DockMaster.MakeDockable(MyForm);
这将把MyForm包装在一个停靠站点中并显示它。它足够聪明,可以判断窗体是否已经被包装在一个停靠站点中。
如果您设置了DockMaster.OnCreateControl事件,您可以使用这个:
DockMaster.ShowControl('MyForm',true);
通过代码手动停靠
使用过程DockMaster.ManualDock将一个站点停靠到另一个站点或停靠到另一个站点内部。
procedure ManualDock(SrcSite, TargetSite: TAnchorDockHostSite; Align: TAlign; TargetControl: TControl = nil);
- SrcSite是要停靠的站点。如果SrcSite已经被停靠,它将首先被取消停靠。
- TargetSite是SrcSite将被停靠到或停靠为邻居的站点。
- TargetControl指定停靠为邻居(=nil)、作为内部邻居(=TargetSide)或在页面前面(=一个TAnchorDockPage)。
通过代码手动取消停靠
使用过程DockMaster.ManualFloat将一个站点从其邻居中取消停靠并创建一个浮动的顶层窗体。嵌入的控件仍然嵌入在TAnchorDockHostSite中。
procedure ManualFloat(AControl: TControl);
您可以提供一个TAnchorDockHostSite或嵌入在TAnchorDockHostSite中的控件(例如,使用MakeDockable制作的窗体)作为参数。站点将被放置在相同的屏幕位置。
保存布局
DockMaster允许将当前布局保存到TConfigStorage。miniide示例使用了xml版本:
procedure TMainIDE.SaveLayout(Filename: string);
var
  XMLConfig: TXMLConfigStorage;
begin
  try
    // 创建一个新的xml配置文件
    XMLConfig:=TXMLConfigStorage.Create(Filename,false);
    try
      // 保存所有窗体的当前布局
      DockMaster.SaveLayoutToConfig(XMLConfig);
      XMLConfig.WriteToDisk;
    finally
      XMLConfig.Free;
    end;
  except
    on E: Exception do begin
      MessageDlg('错误',
        '将布局保存到文件'+Filename+'时出错:'#13+E.Message,mtError,
        [mbCancel],0);
    end;
  end;
end;
加载布局
procedure TMainIDE.LoadLayout(Filename: string);
var
  XMLConfig: TXMLConfigStorage;
begin
  try
    // 加载xml配置文件
    XMLConfig:=TXMLConfigStorage.Create(Filename,True);
    try
      // 恢复布局
      // 这将关闭不需要的窗体,并为所有需要的窗体调用OnCreateControl
      DockMaster.LoadLayoutFromConfig(XMLConfig);
    finally
      XMLConfig.Free;
    end;
  except
    on E: Exception do begin
      MessageDlg('错误',
        '从文件'+Filename+'加载布局时出错:'#13+E.Message,mtError,
        [mbCancel],0);
    end;
  end;
end;
放大/缩小
锚点停靠管理器可以放大/缩小停靠的邻居窗体。这可以通过停靠标题栏的弹出菜单或使用函数DockMaster.ManualEnlarge在代码中完成:
function ManualEnlarge(Site: TAnchorDockHostSite; Side: TAnchorKind; OnlyCheckIfPossible: boolean): boolean;
Site是一个子站点,Side是要扩展的Site的侧边。如果只想测试是否可以放大,则将OnlyCheckIfPossible设置为true。
放大一个,缩小另一个
缩小邻居“对象检查器”,放大“消息”:右键单击“消息”的标题栏,然后点击“放大右侧”。两个分割条将被调整大小。
放大一个,缩小多个
缩小一侧的分割条,放大两个相邻的分割条,旋转后面的分割条,放大控件,缩小旋转分割条上的控件。右键单击“源代码编辑器1”的标题栏,然后点击“放大底部”。
一般停靠选项
AnchorDocking包提供了一个对话框来设置DockMaster的一些属性。该对话框位于AnchorDockOptionsDlg单元中,您可以简单地使用它:
uses ... AnchorDockOptionsDlg;
...
procedure TMainIDE.FormCreate(Sender: TObject);
...
begin
  ...
  DockMaster.OnShowOptions:=@ShowAnchorDockOptions;
  ...
end;
这将向停靠标题栏和页面的弹出菜单中添加一个新的菜单项“停靠选项”。
为什么使用锚点而不是对齐?
锚点允许创建任何可能的矩形布局。对齐是有限制的。对齐与面板结合使用理论上可以创建很多布局,但仍然不是全部。而且,一些操作(如放大/缩小)使用对齐/面板比使用锚点更复杂。对齐对于少数窗体来说工作得很好,但停靠的窗体越多,对齐的缺点就越明显。
使用对齐可以创建的布局
对齐只能创建以下布局:
alTop控件始终位于顶部,填满整个水平宽度。这是因为LCL首先将所有控件与alTop对齐,然后是alBottom、alLeft、alRight,最后是alClient。
使用对齐和面板可以创建的布局
通过使用隐藏的面板,可以嵌套对齐布局。然后可以创建任何可以递归地分成两半的布局。例如,您可以创建:
这只需要一个隐藏的面板。
更改布局
现在用户想要水平放大“FPDocEditor”(并缩小“CodeExplorer”)。使用“AnchorDocking”,您只需右键单击“FPDocEditor”的标题栏,然后点击“放大右侧”。
其他停靠引擎至少需要两个面板。一个用于“SrcEditor”、“Messages”、“FPDocEdit”、“CodeExpl”,另一个用于“SrcEdit”和“Messages”。大多数停靠布局器甚至不提供以这种方式更改布局的简单方法。允许这种布局更改的算法必须分析整个结构,就好像没有面板一样,并且必须重新分配很多东西。基本上,该算法必须执行与锚点停靠算法相同的操作,但还需要将布局转换为对齐加上隐藏面板的额外工作。
使用对齐和面板无法创建的布局
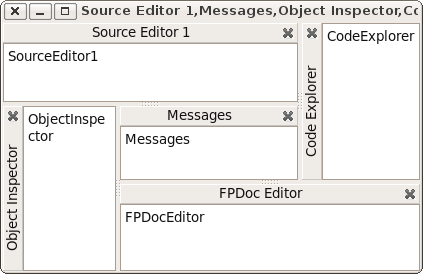
现在用户想要水平放大“源代码编辑器1”(并缩小“对象检查器”):
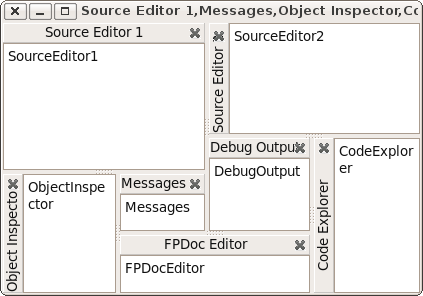
这个布局使用对齐和面板是无法实现的,因为您无法将其切成两半。与以下情况相同:
结论
使用隐藏面板的对齐允许您轻松地创建一个简单的停靠管理器,适用于少数窗体,但它始终会限制用户。对齐对于行和列布局很有用,但对于表格布局则不然。锚点停靠甚至适用于复杂的窗体。
旧版/已弃用的锚点停靠
创建一个TLazDockingManager
DockingManager:=TLazDockingManager.Create(Self);
作为参数的Self仅用作Owner。这意味着,当主窗体被释放时,DockingManager也会被释放。您可以使用nil并自行释放DockingManager。
可选:加载配置
您可以从磁盘加载用户配置。
  Config:=TXMLConfigStorage.Create('config.xml',true);
  DockingManager.LoadFromConfig(Config);
  Config.Free;
这将加载文件config.xml。该配置可以使用SaveToConfig函数创建。见下文。
使窗体/控件可停靠
为每个应该可停靠的窗体/控件创建一个TLazControlDocker
  ControlDocker1:=TLazControlDocker.Create(Self);
  ControlDocker1.Name:='DockerForm1';
  ControlDocker1.Manager:=DockingManager;
可选:将用户配置保存到磁盘
当程序关闭时,您可以将用户配置保存到磁盘
  Config:=TXMLConfigStorage.Create('config.xml',true);
  DockingManager.SaveToConfig(Config);
  Config.WriteToDisk;
  Config.Free;
另请参阅
- AnchorDockingDsgn 在Lazarus IDE中的AnchorDocking
- Anchor Docking: 逐步示例
- Docking 停靠一般信息
- EasyDockingManager - 一个具有更简单布局引擎和更少选项的停靠实现替代方案。
